SonarQube (Self-Host)
We will deploy SonarQube Self-Host on the Build Instance. You can read more here.
First, create a working directory:
cd && mkdir -p /root/tools/sonar && vi /root/tools/sonar/docker-compose.yml
Enter the following content:
version: "3"

services:
  sonarqube:
    image: sonarqube:community
    depends_on:
      - db
    environment:
      SONAR_JDBC_URL: jdbc:postgresql://db:5432/sonar
      SONAR_JDBC_USERNAME: sonar
      SONAR_JDBC_PASSWORD: sonar
    volumes:
      - sonarqube_data:/opt/sonarqube/data
      - sonarqube_extensions:/opt/sonarqube/extensions
      - sonarqube_logs:/opt/sonarqube/logs
    ports:
      - "9000:9000"
  db:
    image: postgres:12
    environment:
      POSTGRES_USER: sonar
      POSTGRES_PASSWORD: sonar
    volumes:
      - postgresql:/var/lib/postgresql
      - postgresql_data:/var/lib/postgresql/data

volumes:
  sonarqube_data:
  sonarqube_extensions:
  sonarqube_logs:
  postgresql:
  postgresql_data:
Run the docker-compose.yml file:
docker-compose -f tools/sonar/docker-compose.yml up -d
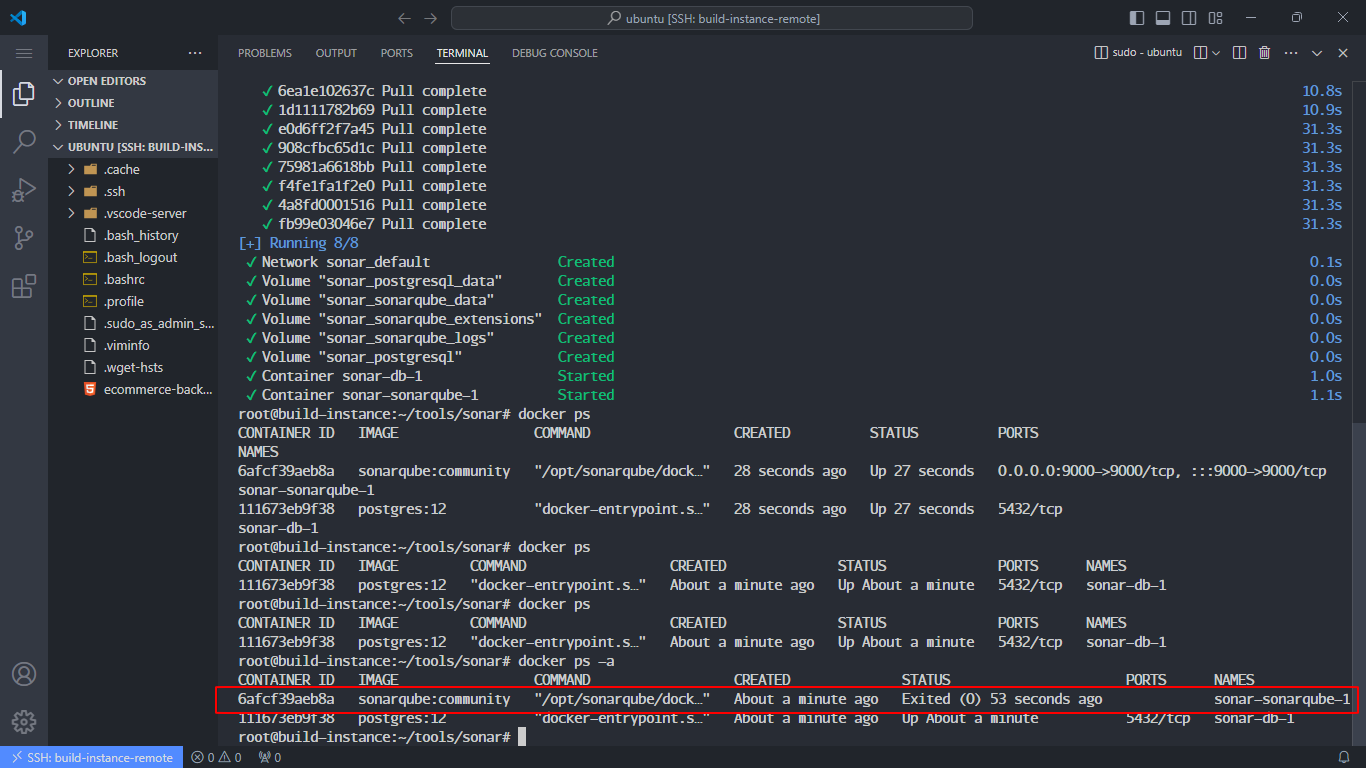
When you run docker ps -a, you might see the sonar-sonarqube-1 container exited:
Use docker logs to check the error:
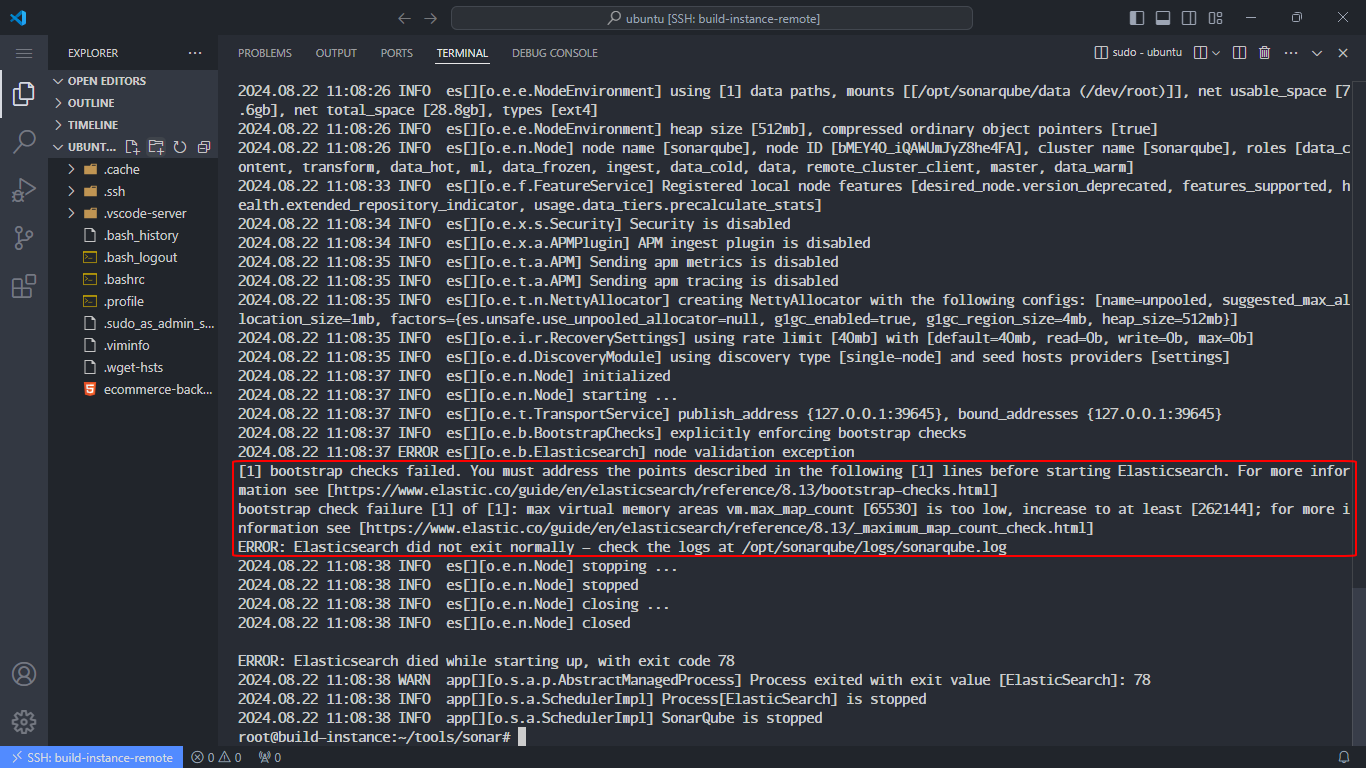
Elasticsearch uses many virtual memory areas to map large data files into memory. If the value of vm.max_map_count is too low, Elasticsearch will not be able to map enough memory areas, leading to startup or runtime errors. This is the cause of the “bootstrap checks failed” error.
Fix this by increasing max_map_count:
sysctl vm.max_map_count
sudo sysctl -w vm.max_map_count=262144

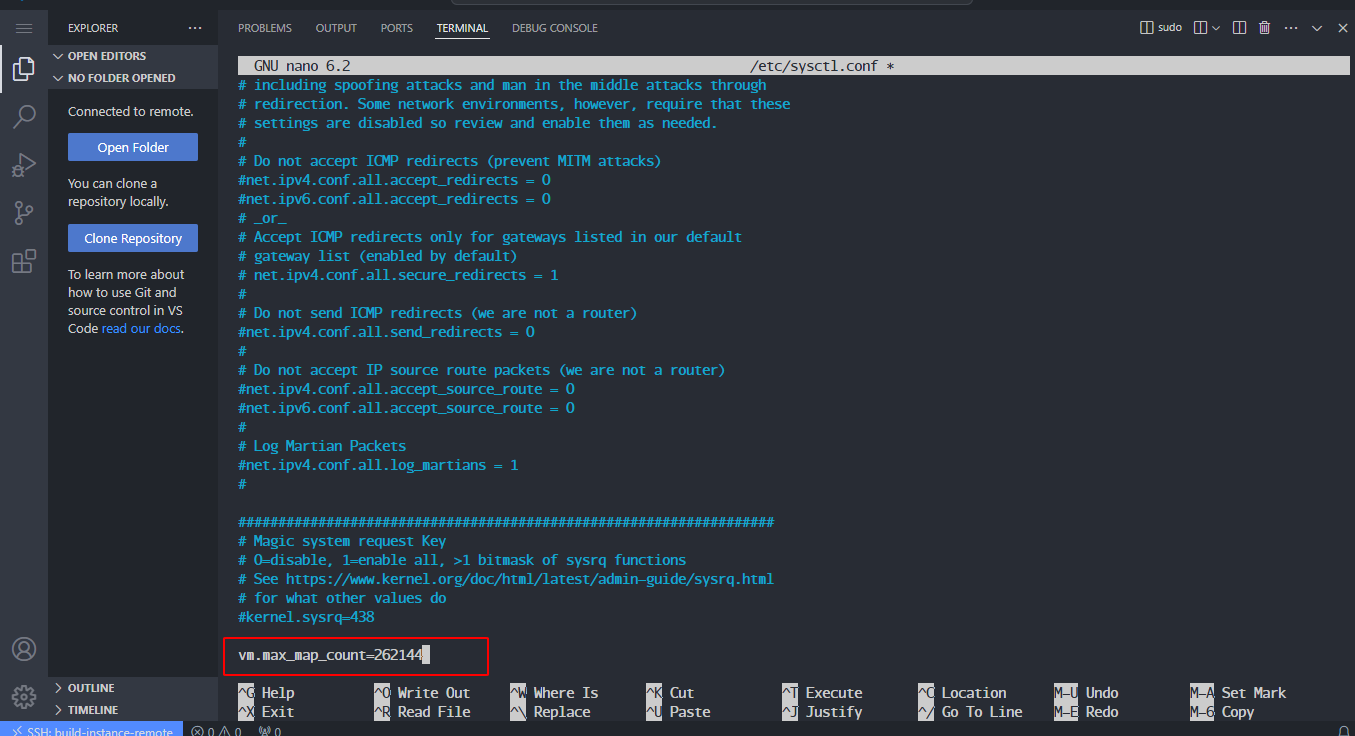
Edit the file /etc/sysctl.conf:
sudo nano /etc/sysctl.conf
Add this line to the end of the file:
vm.max_map_count=262144
Restart docker-compose in /root/tools/sonar/:
cd /root/tools/sonar/
docker-compose down
docker-compose up -d

The containers should now be running:

You need to configure port 9000 to access SonarQube:
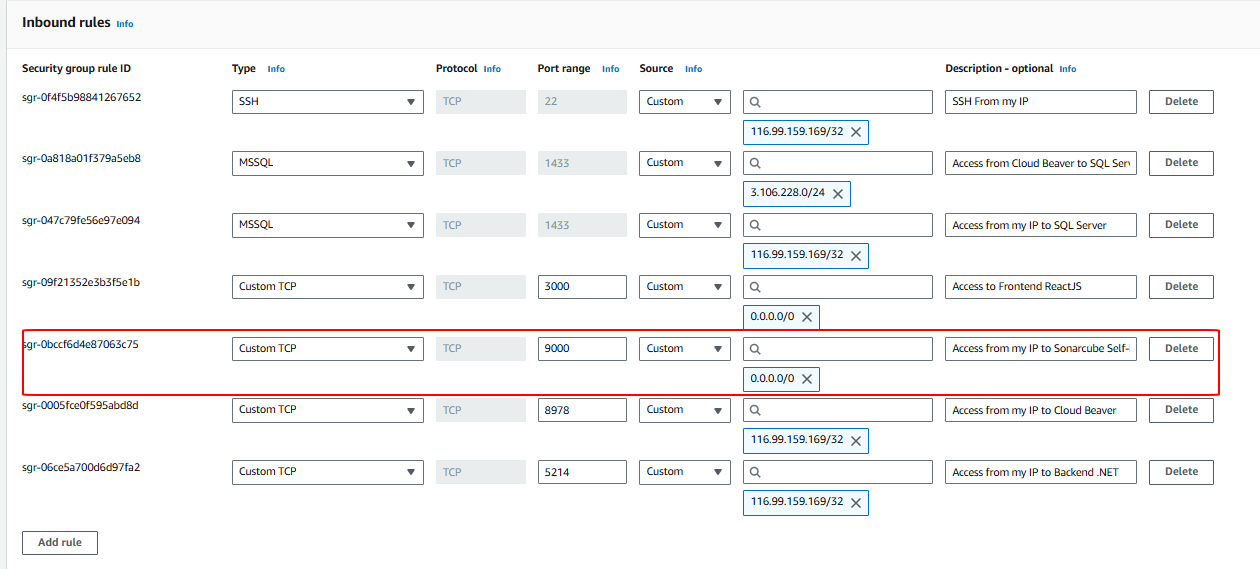
Check port 9000 to access the SonarQube main interface:
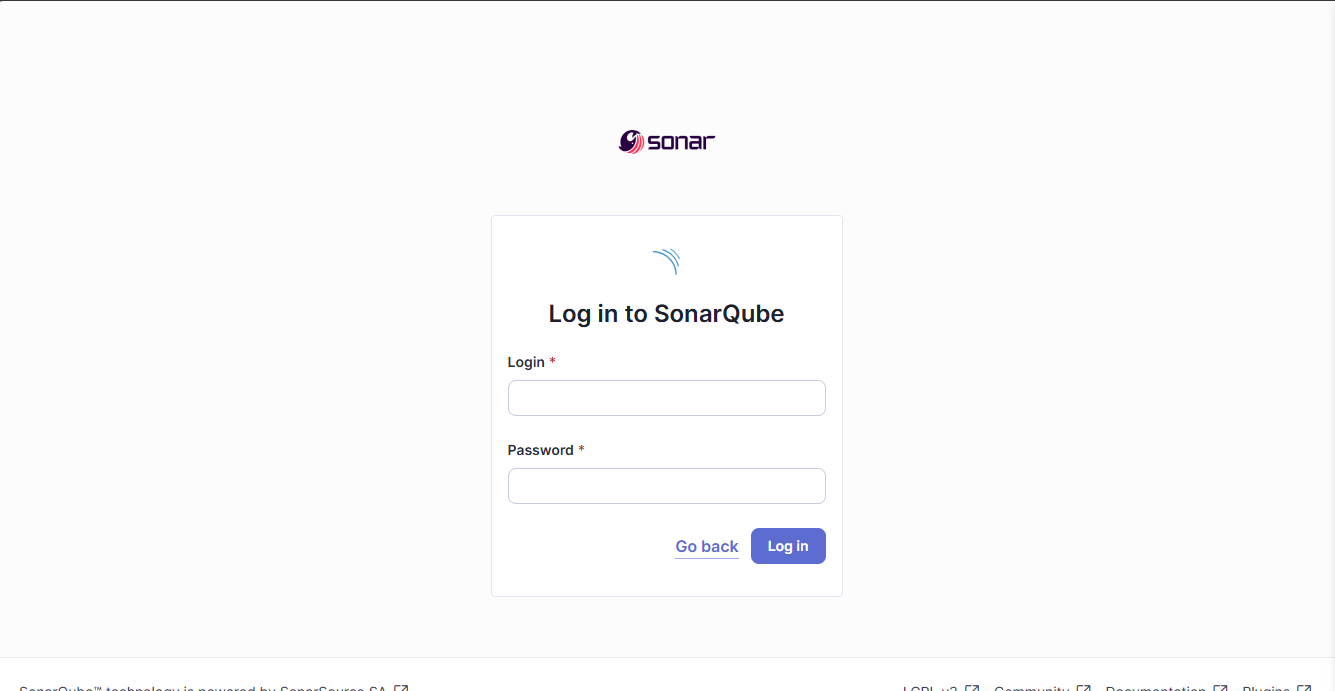
For more information on connecting, see: (2) GitLab Integration | Mapping your organization into SonarQube - YouTube
Log in with:
- username: admin
- password: admin
After logging in, update the password:
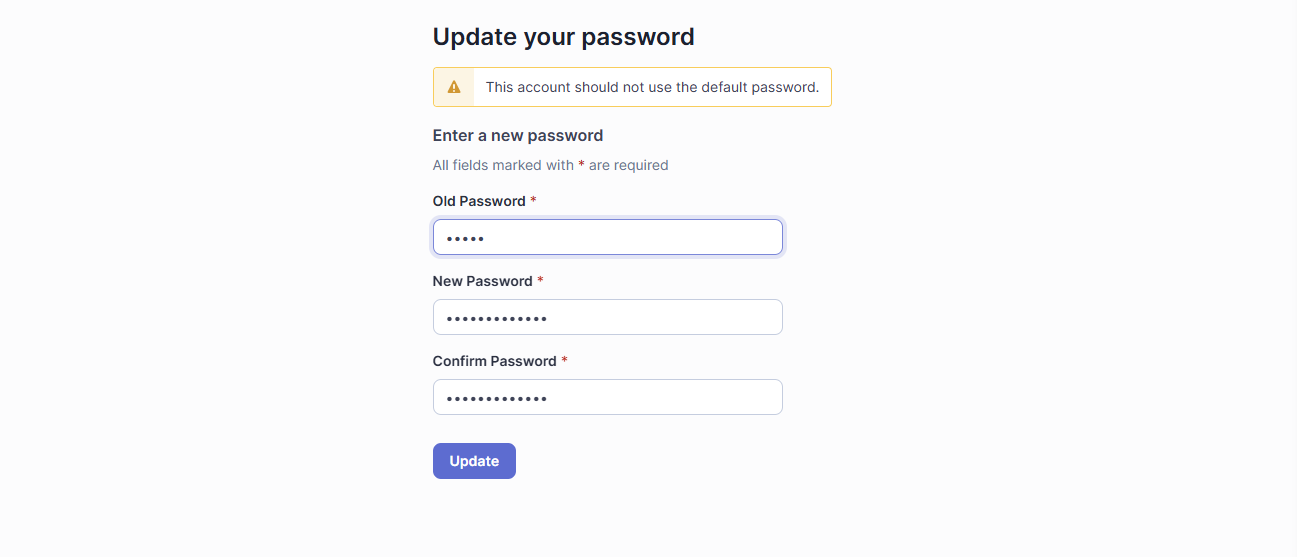
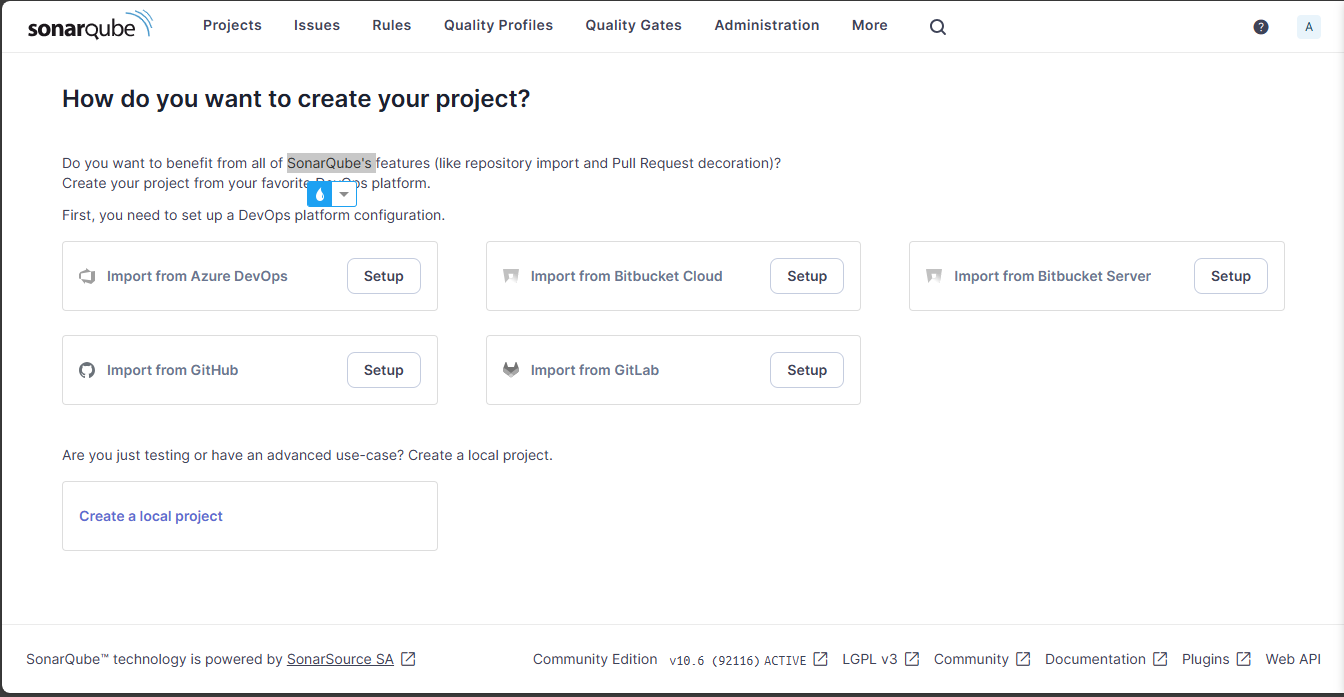
This is the main interface of SonarQube:
- Configuration name: ecommerce-gitlab-instance
- GitLab API URL: https://gitlab.com/api/v4
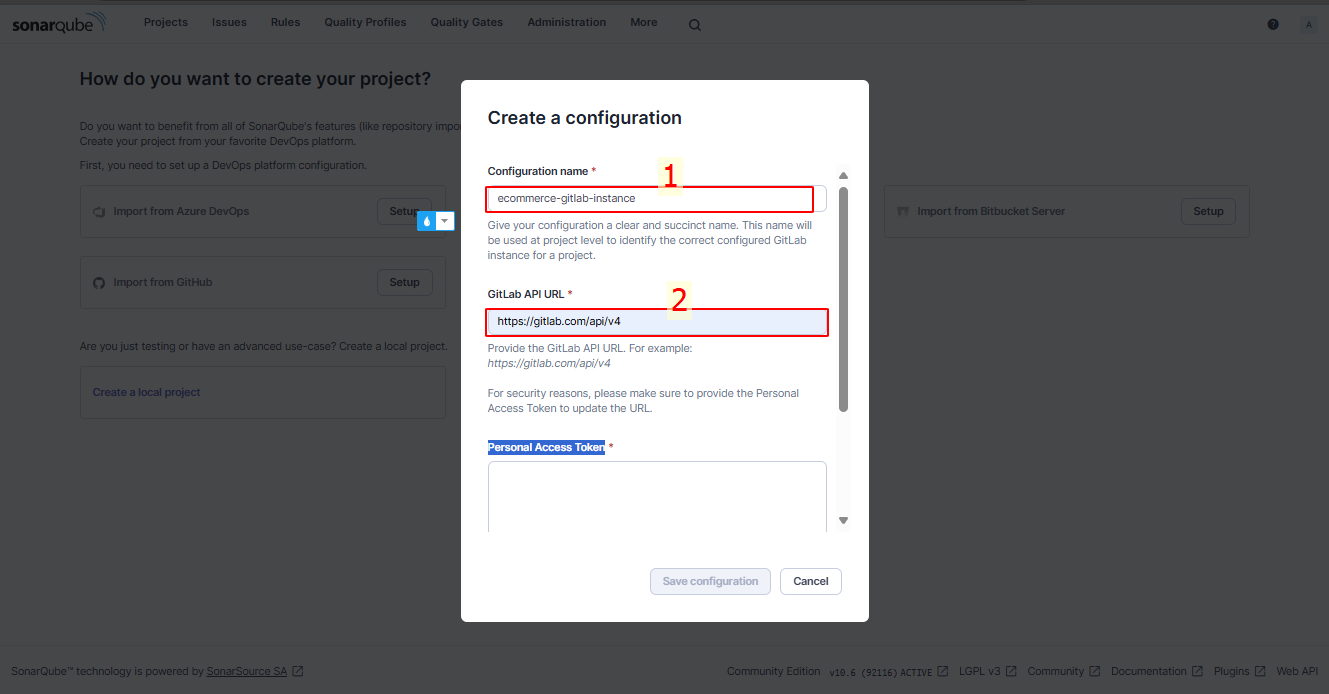
Personal Access Token: You will create a new token in Edit Profile → Access Tokens → Add new token
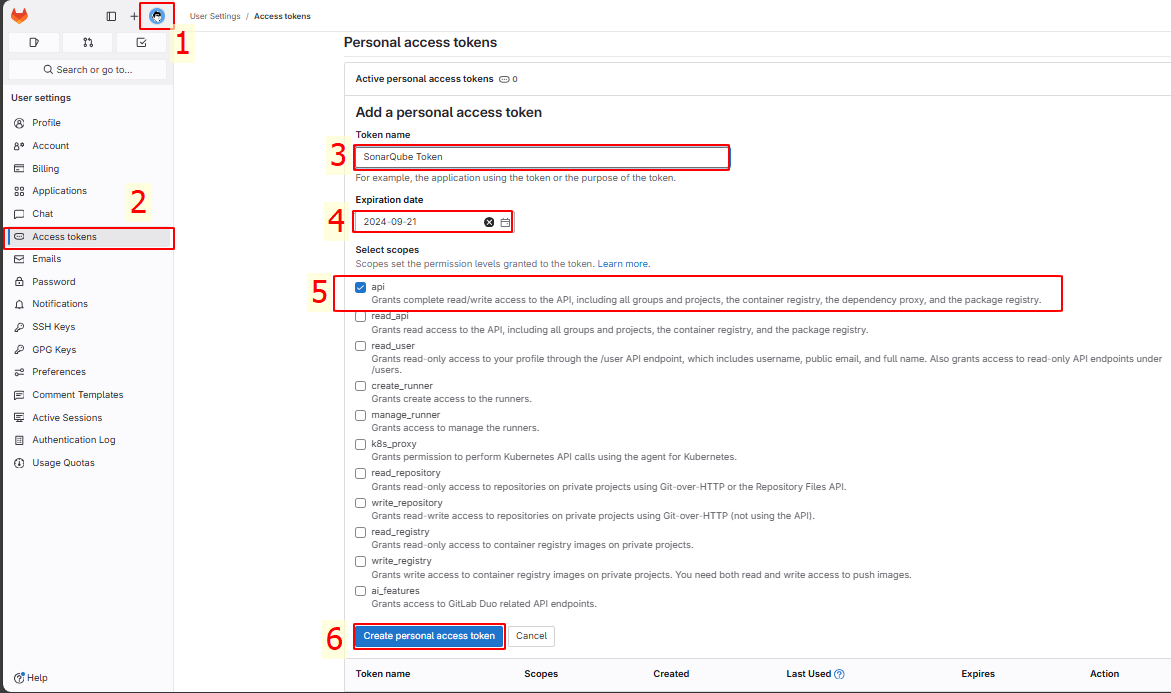
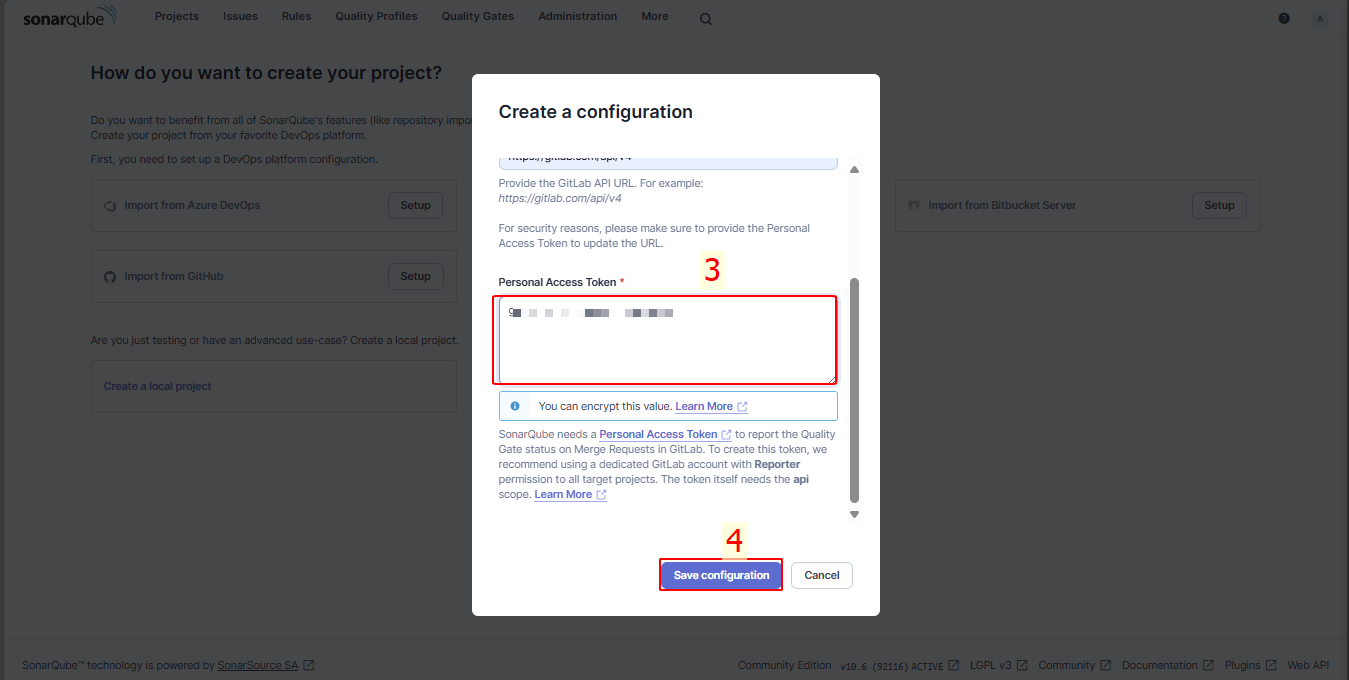
Copy this token and paste it into Personal Access Token in SonarQube, then save the configuration:
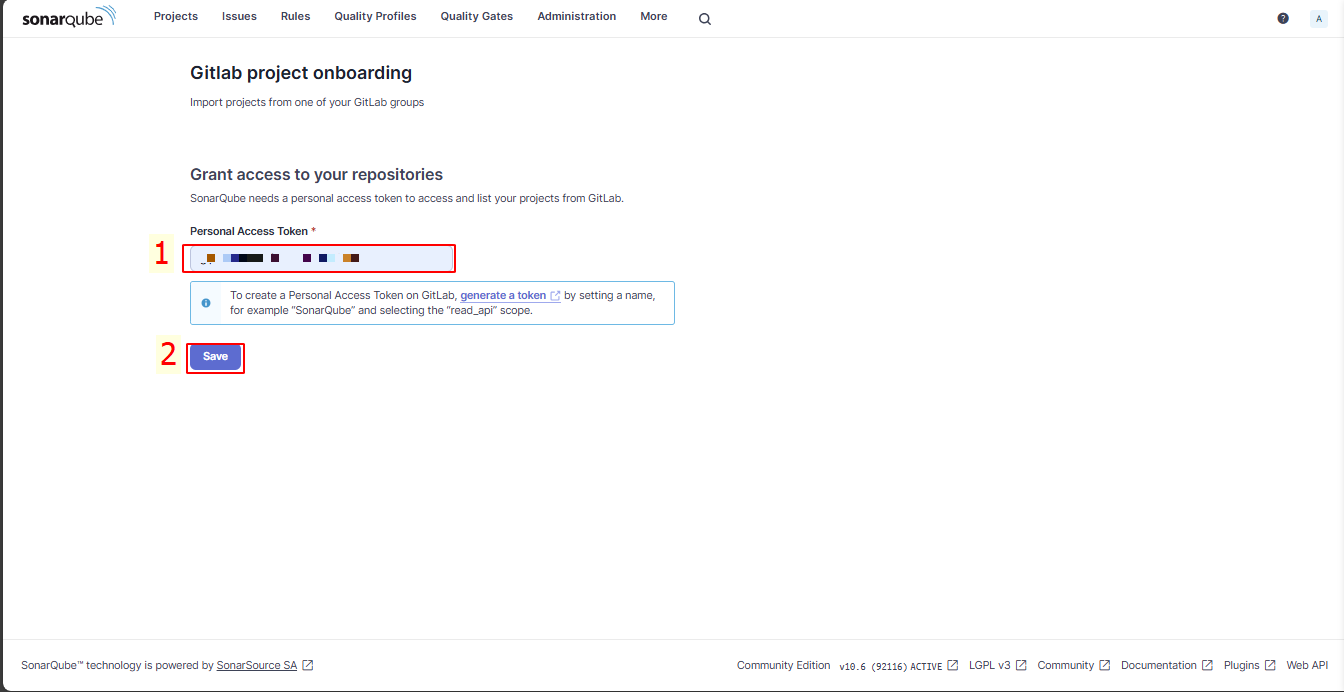
In GitLab project onboarding, enter the token:
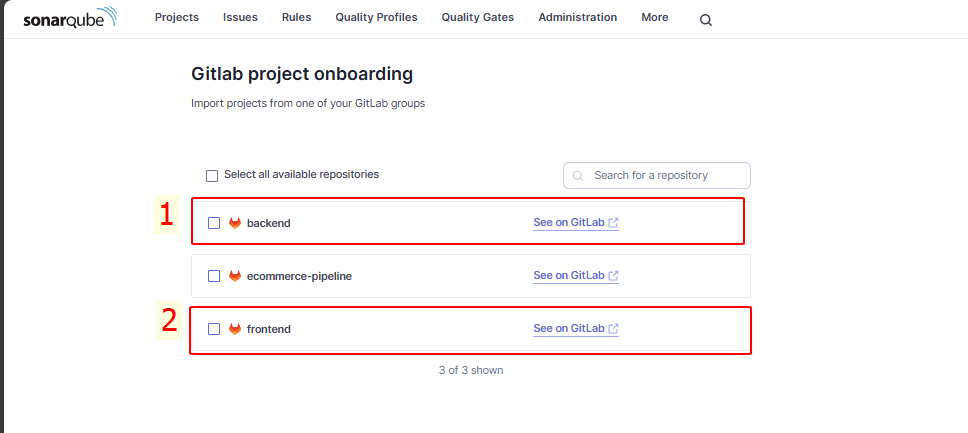
Select the frontend and backend projects to import:
In the Set up 2 projects for Clean as You Code section, select Use the global setting:
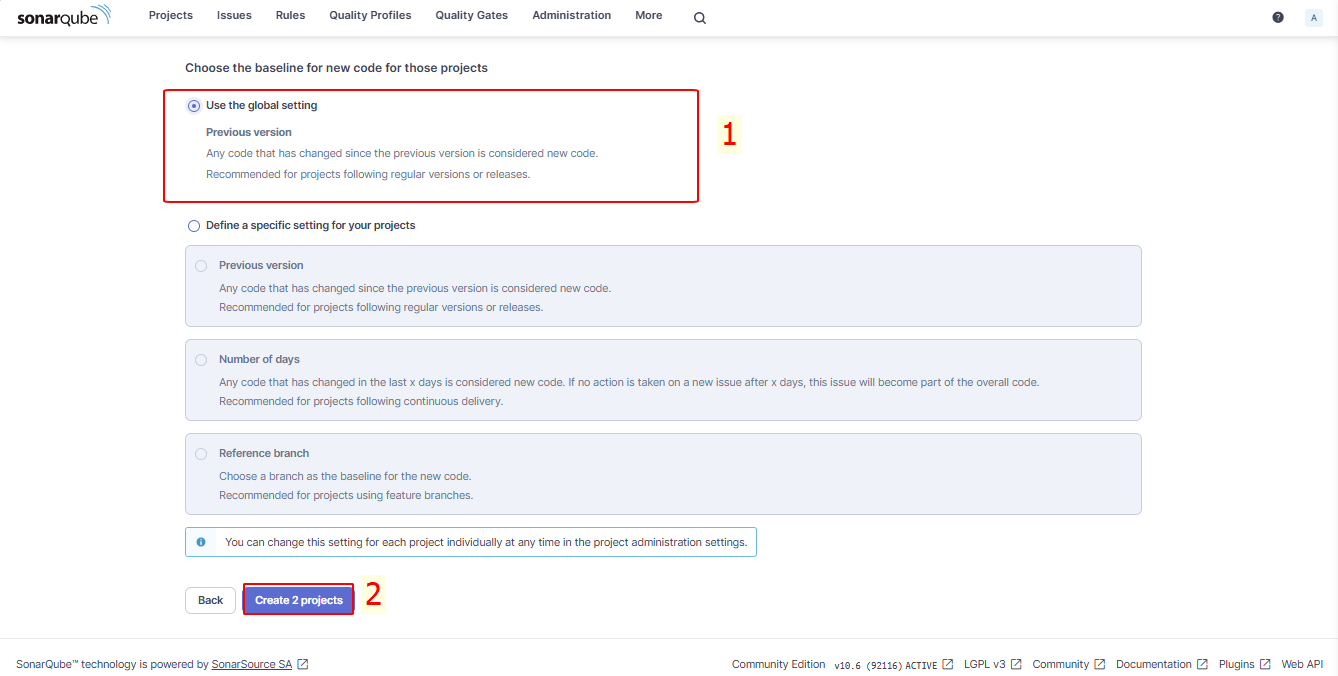
We will select the Backend section first:
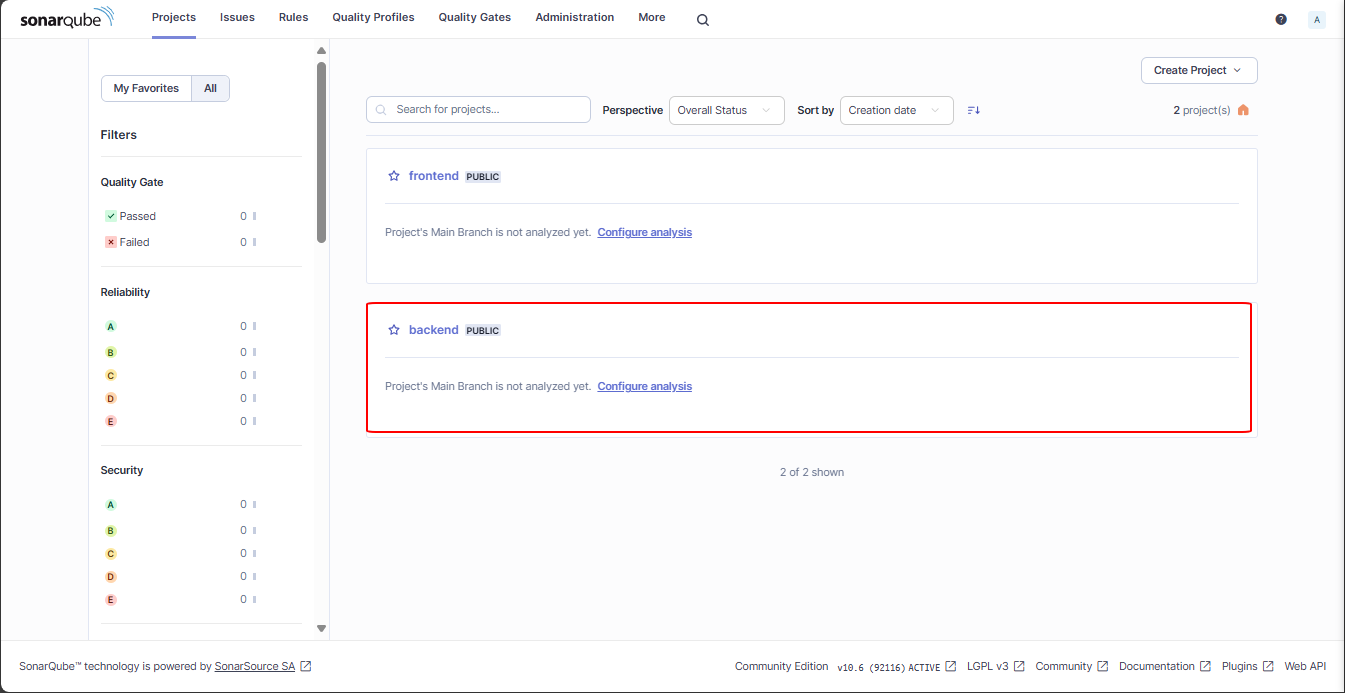
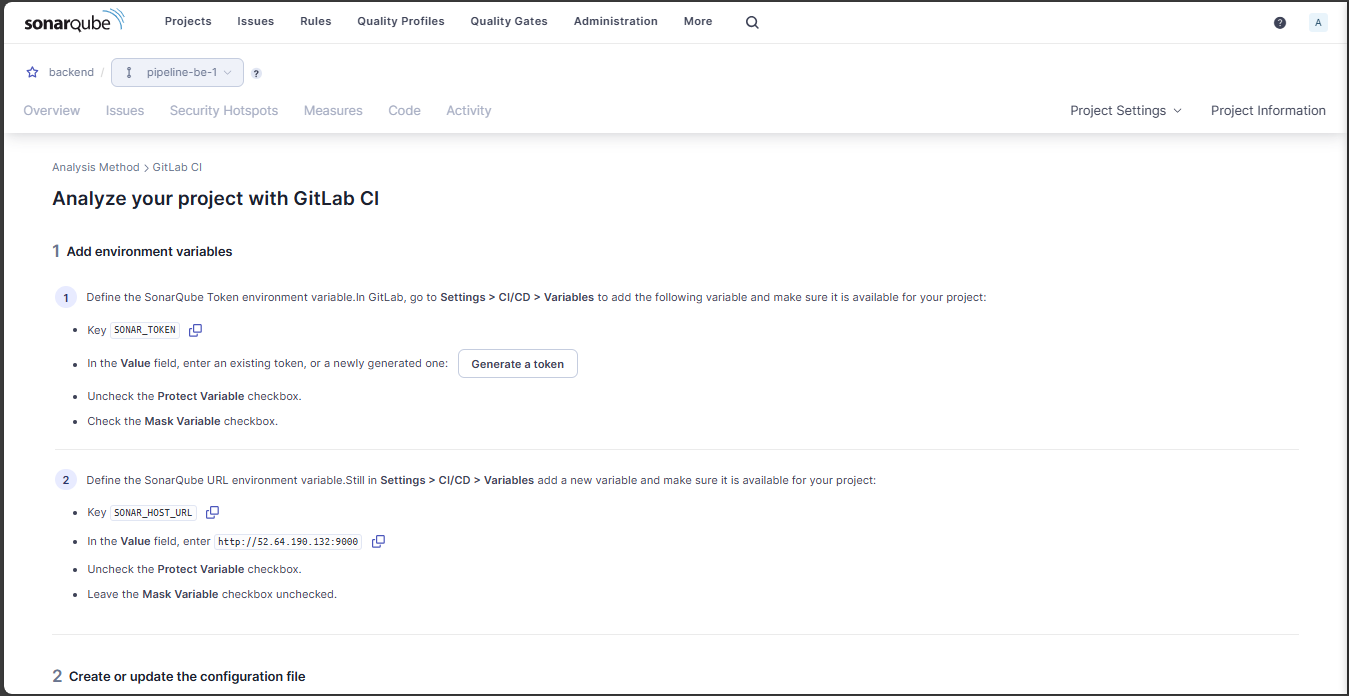
Follow the instructions:
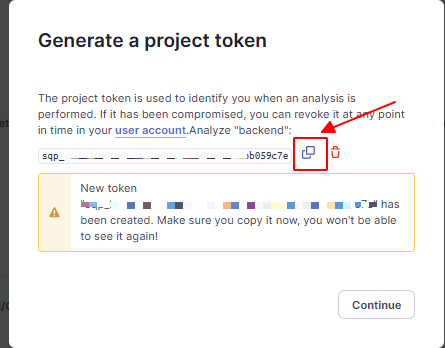
Create a token for the project:

Click create:
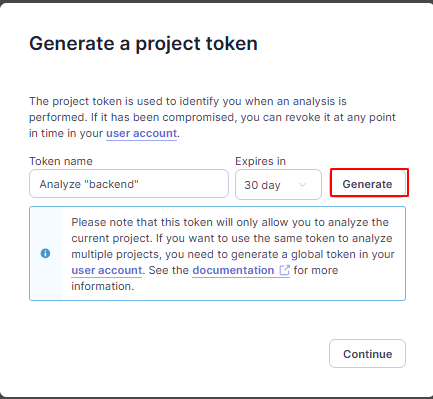
Then copy the token:
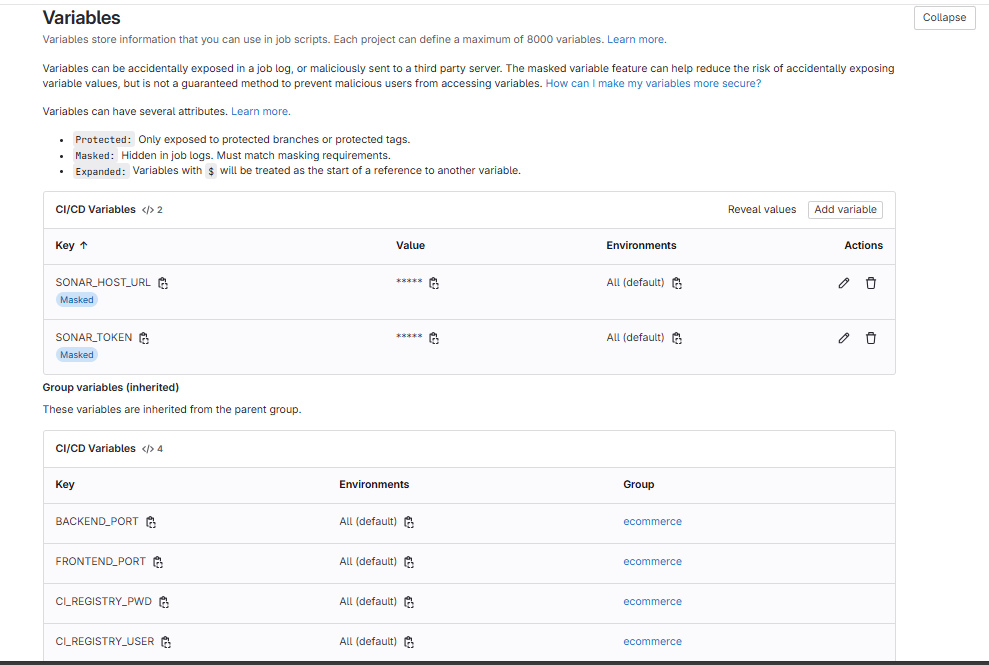
Go to the backend project to create a new variable:
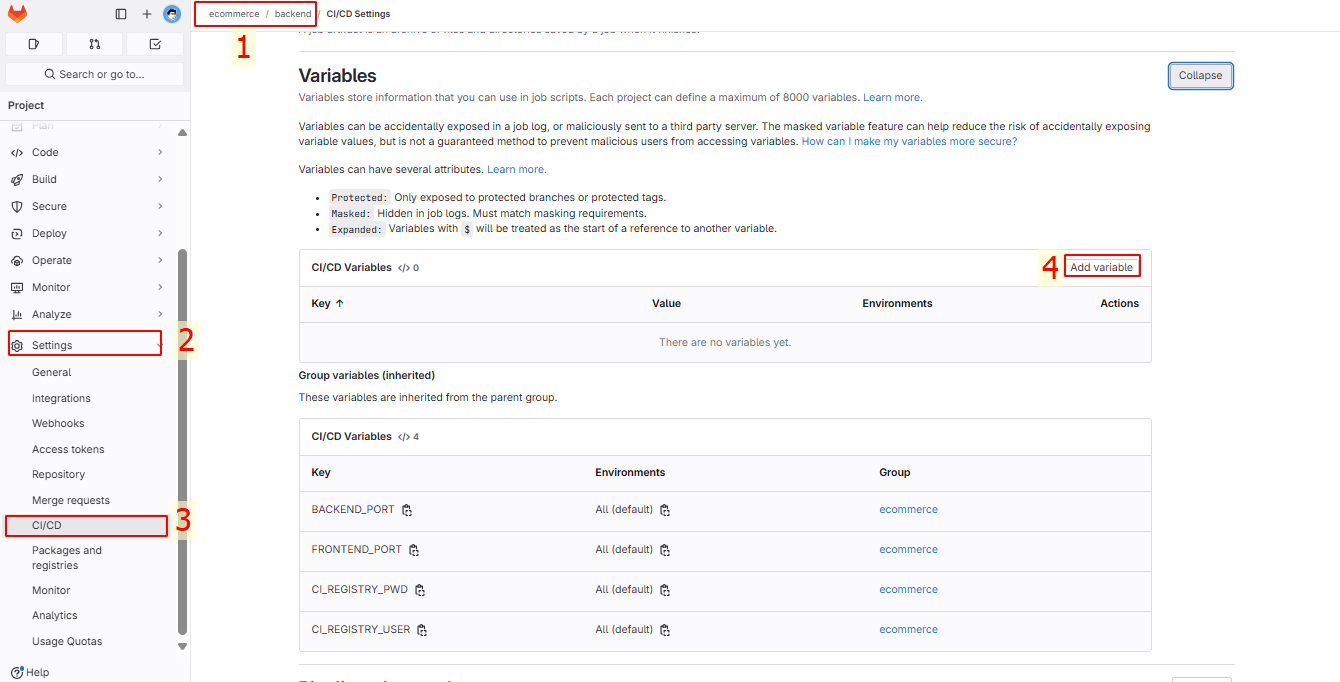
Create as instructed in step 1:
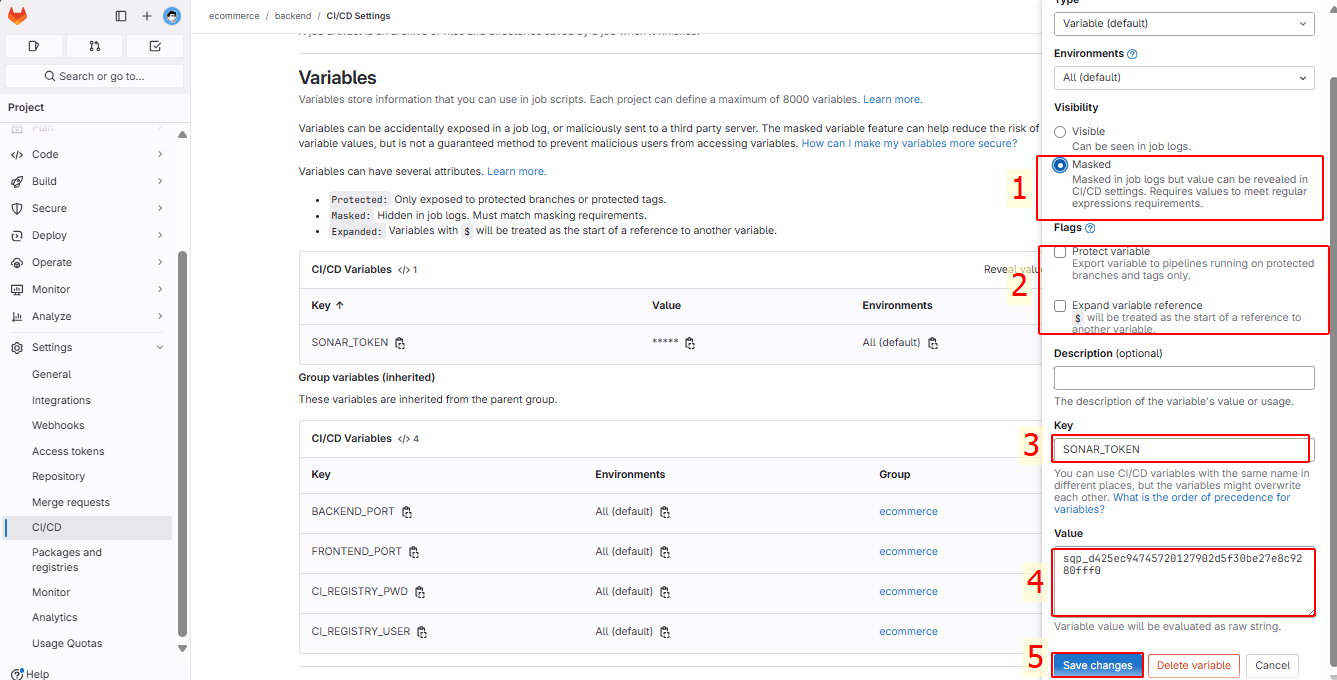
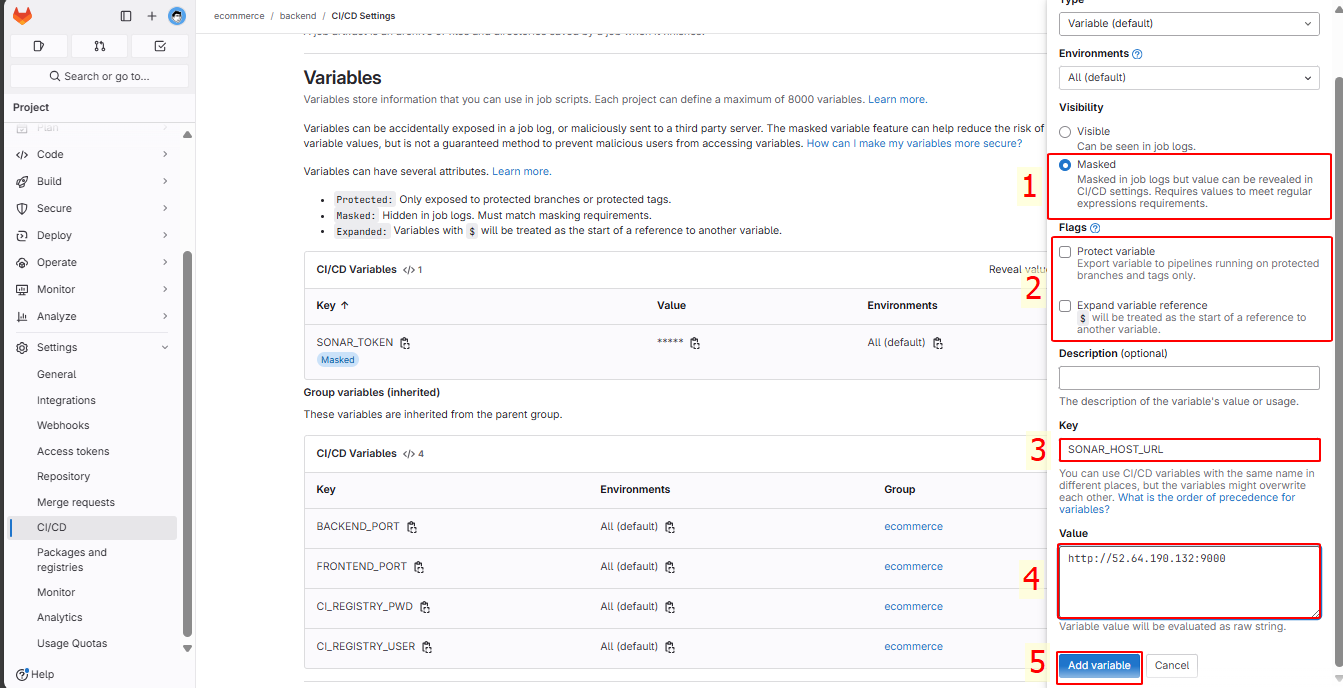
You will have 2 variables, SONAR_TOKEN and SONAR_HOST_URL:
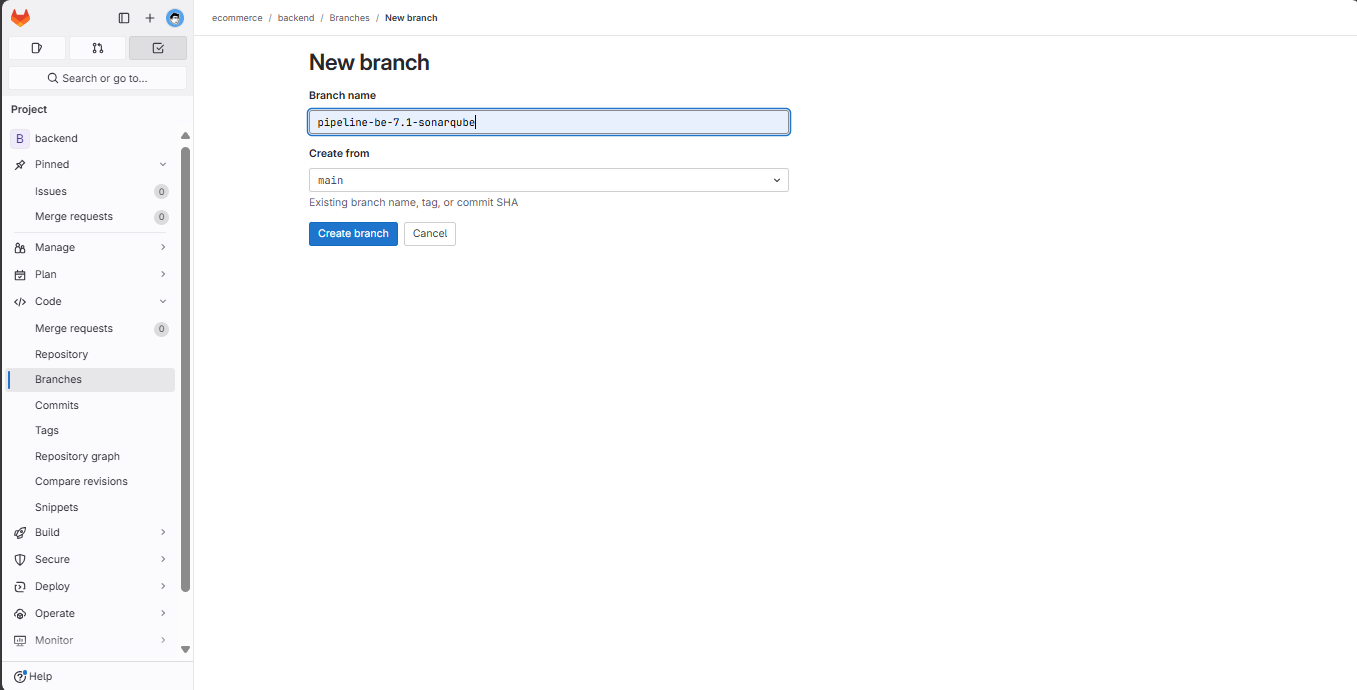
Create a new branch named pipeline-be-7.1-sonarqube from the previous pipeline-be-codelimate:
Edit the gitlab-ci.yaml file in the newly created branch:
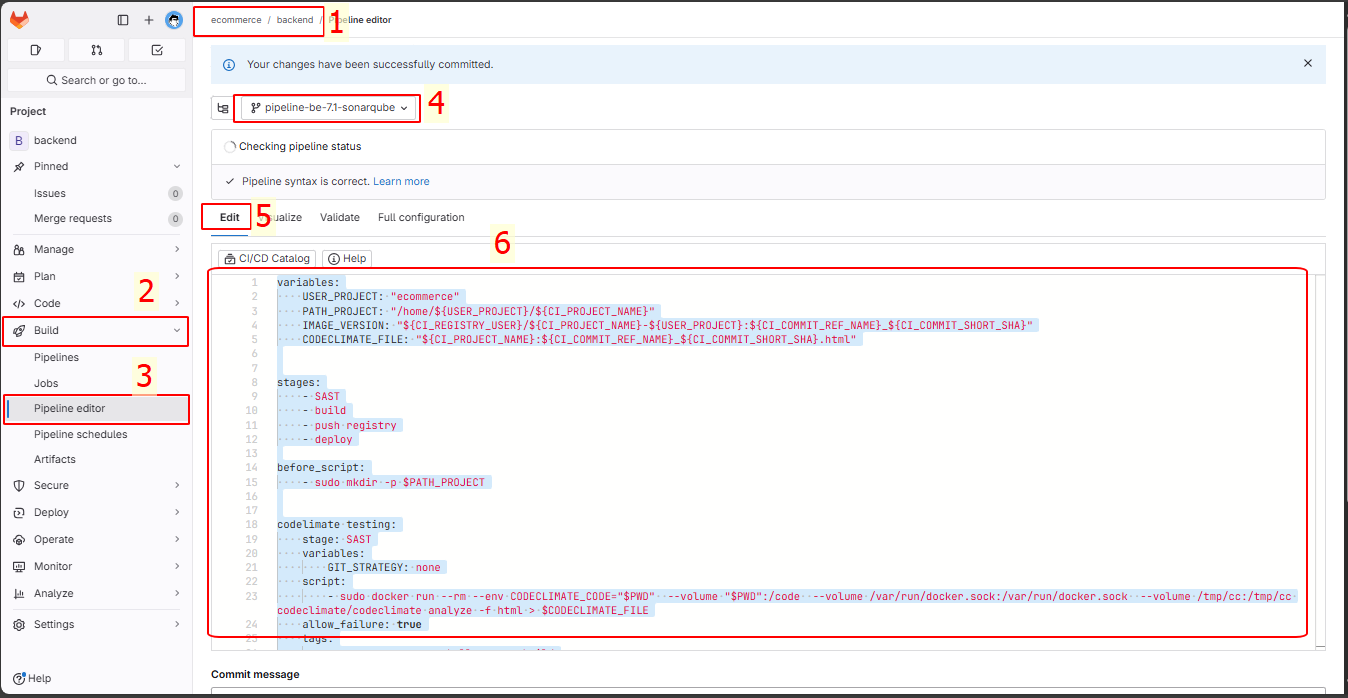
Enter the following commands and then commit:
variables:
    USER_PROJECT: "ecommerce"
    PATH_PROJECT: "/home/${USER_PROJECT}/${CI_PROJECT_NAME}"
    IMAGE_VERSION: "${CI_REGISTRY_USER}/${CI_PROJECT_NAME}-${USER_PROJECT}:${CI_COMMIT_REF_NAME}_${CI_COMMIT_SHORT_SHA}"
    CODECLIMATE_FILE: "${CI_PROJECT_NAME}:${CI_COMMIT_REF_NAME}_${CI_COMMIT_SHORT_SHA}.html"

stages:
    - clone
    - SAST
    - build
    - push registry
    - deploy

before_script:
    - sudo mkdir -p $PATH_PROJECT

clone repository:
    stage: clone
    script:
        - echo "Repository cloned."
    tags:
        - group-ecommerce-shell-runner-build

codelimate testing:
    stage: SAST
    variables:
        GIT_STRATEGY: none
    script:
        - sudo docker run --rm --env CODECLIMATE_CODE="$PWD"  --volume "$PWD":/code  --volume /var/run/docker.sock:/var/run/docker.sock  --volume /tmp/cc:/tmp/cc codeclimate/codeclimate analyze -f html > $CODECLIMATE_FILE
    allow_failure: true
    tags:
        - group-ecommerce-shell-runner-build
    only:
        - tags
    artifacts:
        paths:
        - $CODECLIMATE_FILE
        expire_in: 1 week

sonarqube testing:
  stage: SAST
  cache:
    policy: pull
    key: "${CI_COMMIT_SHORT_SHA}"
    paths:
      - sonar-scanner/
  script:
    - "sudo apt-get update"
    - "sudo apt-get install --yes --no-install-recommends openjdk-17-jre"
    - |
      if ! dotnet tool list -g | grep -q 'dotnet-sonarscanner'; then
        dotnet tool install --global dotnet-sonarscanner
      else
        echo "dotnet-sonarscanner is already installed"
      fi
    - "export PATH=\"$PATH:$HOME/.dotnet/tools\""
    - echo "$SONAR_TOKEN"
    - echo "$SONAR_HOST_URL"
    - "dotnet sonarscanner begin /k:\"ecommerce-fsn_backend_870b5bec-7663-4e18-b150-2f75835d4455\" /d:sonar.token=\"$SONAR_TOKEN\" /d:\"sonar.host.url=$SONAR_HOST_URL\" "
    - "dotnet build"
    - "dotnet sonarscanner end /d:sonar.token=\"$SONAR_TOKEN\""
  allow_failure: true
  tags:
    - group-ecommerce-shell-runner-build
  only:
    - tags

build:
    stage: build
    variables:
        GIT_STRATEGY: clone
    before_script:
        - sudo docker login -u $CI_REGISTRY_USER -p $CI_REGISTRY_PWD
    script:
        - sudo docker build -t $IMAGE_VERSION .
    after_script:
        - sudo docker logout
    tags:
        - group-ecommerce-shell-runner-build
    when: manual
    only:
        - tags

dockerhub pushing:
    stage: push registry
    variables:
        GIT_STRATEGY: none
    before_script:
        - sudo docker login -u $CI_REGISTRY_USER -p $CI_REGISTRY_PWD
    script:
        - sudo docker push $IMAGE_VERSION
    after_script:
        - sudo docker logout
    tags:
        - group-ecommerce-shell-runner-build
    needs:
        - job: build
    only:
        - tags

deploy:
    stage: deploy
    variables:
        GIT_STRATEGY: none
    before_script:
        - sudo docker login -u $CI_REGISTRY_USER -p $CI_REGISTRY_PWD
    script:
        - sudo docker pull $IMAGE_VERSION
        - sudo su ${USER_PROJECT} -c "
            container_exists=\$(sudo docker ps -a -q -f name=${CI_PROJECT_NAME});
            if [ ! -z \"\$container_exists\" ]; then
                sudo docker rm -f ${CI_PROJECT_NAME};
            fi;
            sudo docker run --name ${CI_PROJECT_NAME} -dp ${BACKEND_PORT}:${BACKEND_PORT} ${IMAGE_VERSION}"
    after_script:
        - sudo docker logout
    tags:
        - group-ecommerce-shell-runner
    needs:
        - job: dockerhub pushing
    only:
        - tags
You can turn on the Visualize and Validate tabs to check if the content entered in gitlab-ci.yaml is correct!
🡇 Content 🡇
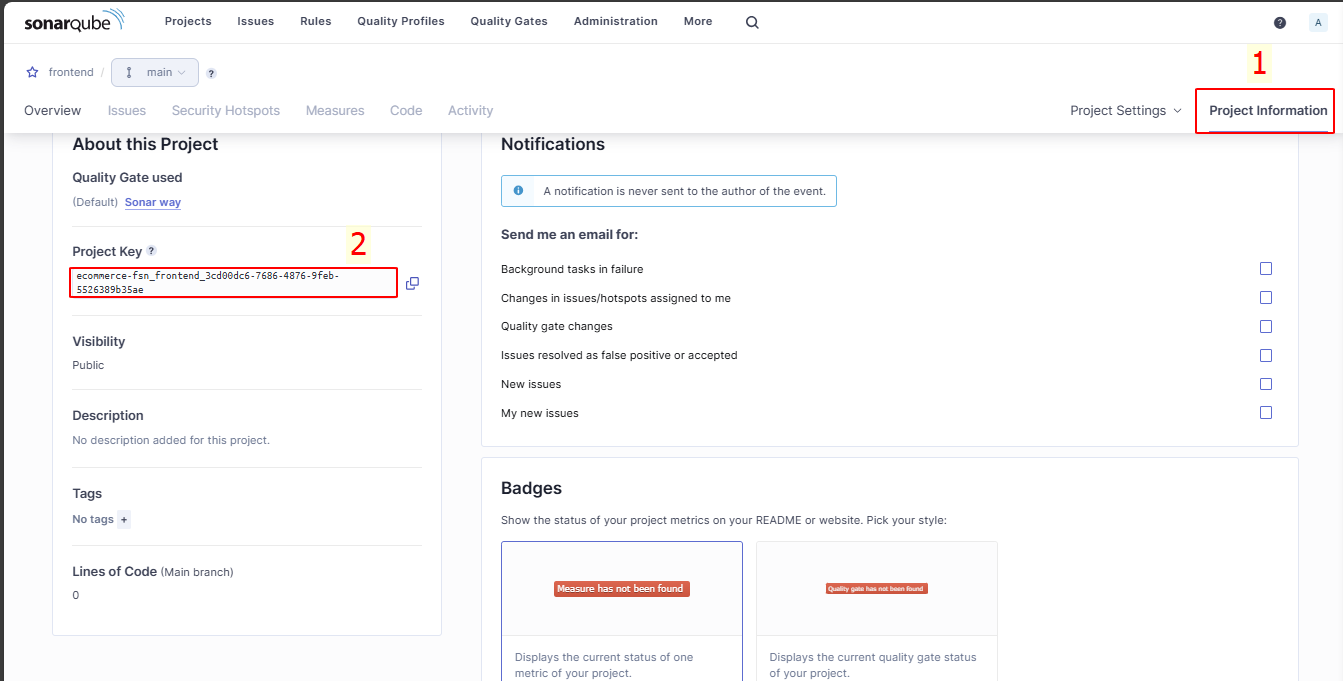
You need to adjust the Project Key in this line to match yours to ensure correct results. If you prefer, you can add a new variable to avoid confusion.
- "dotnet sonarscanner begin /k:\"$PROJECT_BACKEND_ID\" /d:sonar.token=\"$SONAR_TOKEN\" /d:\"sonar.host.url=$SONAR_HOST_URL\""
You can get the Project Key from Project Information → Project Key → copy Project Key
🡅 Content 🡅
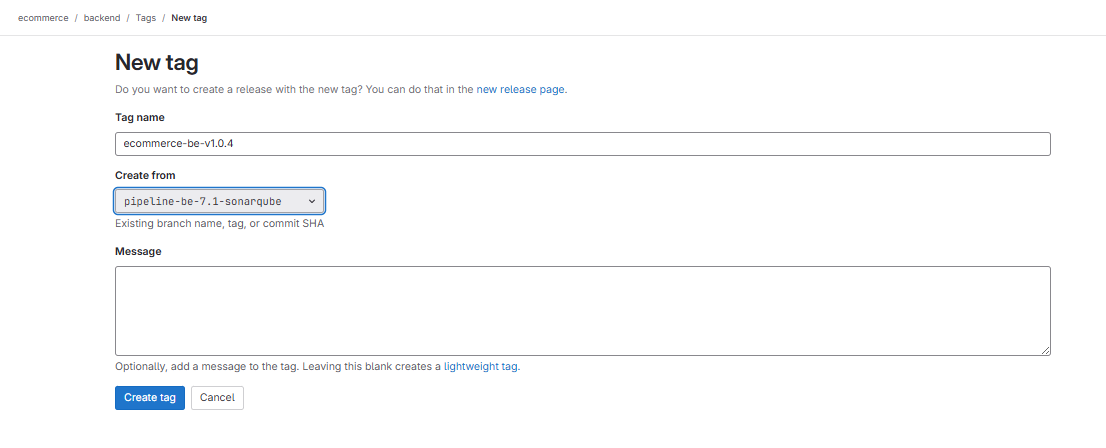
We create a new tag to trigger the pipeline.
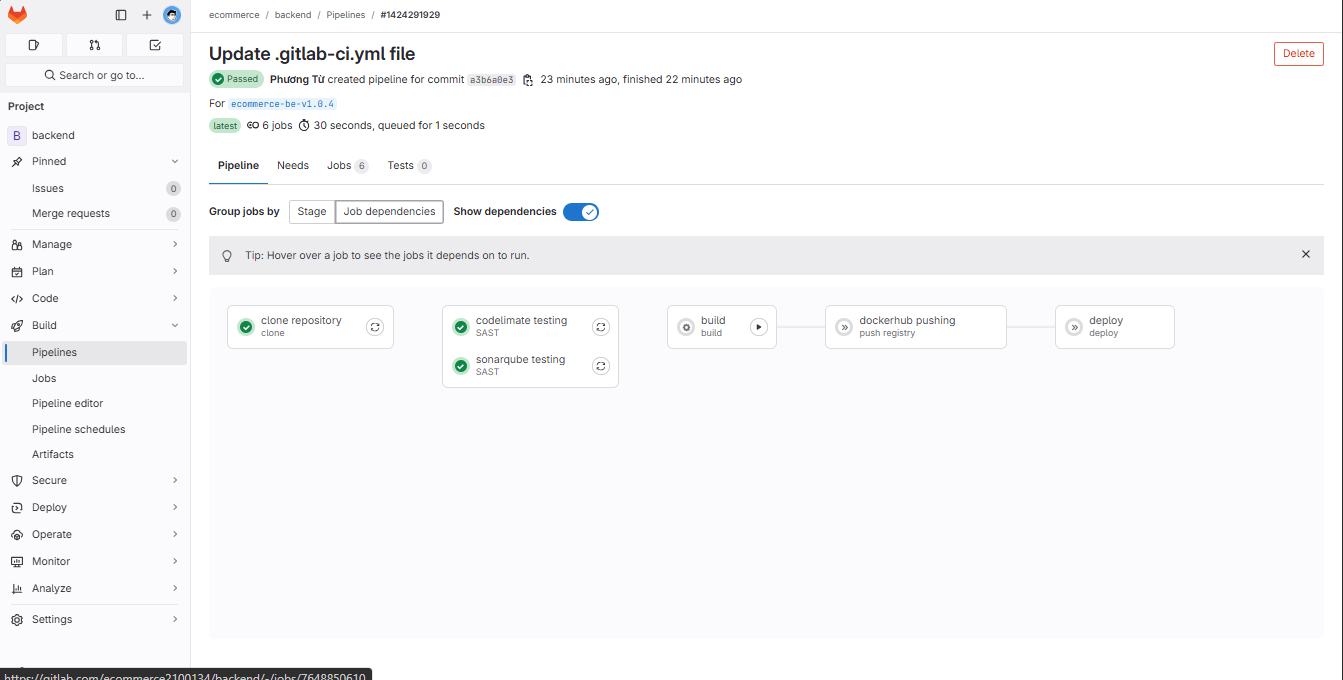
The pipeline has successfully run. You can click on the job dependencies tab and turn on show dependencies to see the relationship between stages. Here you can see that the clone step runs first to fetch the project, followed by the SAST stage where both codelimate testing and sonarqube testing run in parallel. After that, the build step is manually triggered, followed by dockerhub pushing and finally deploy.
The SonarQube testing step has successfully completed.
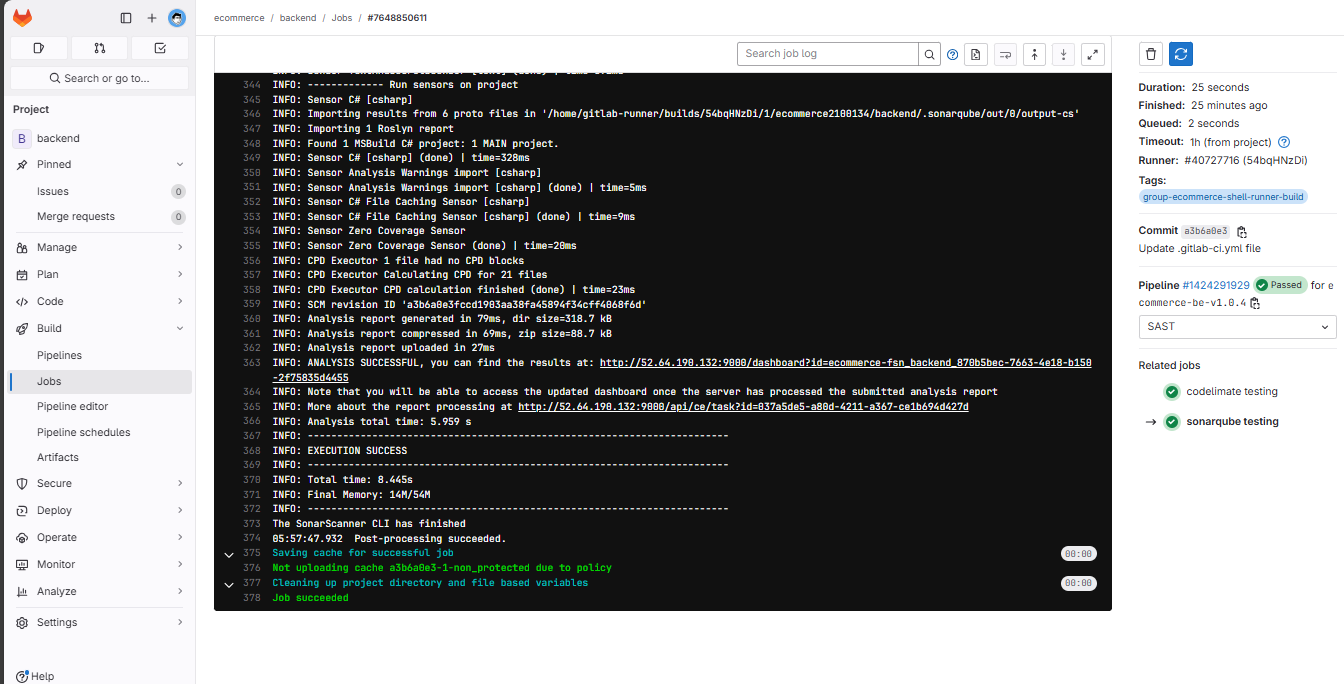
If you cannot run the SonarQube testing step, run it manually using the script in the build instance with script permissions.
Reload the backend project, and you will see the overview interface.
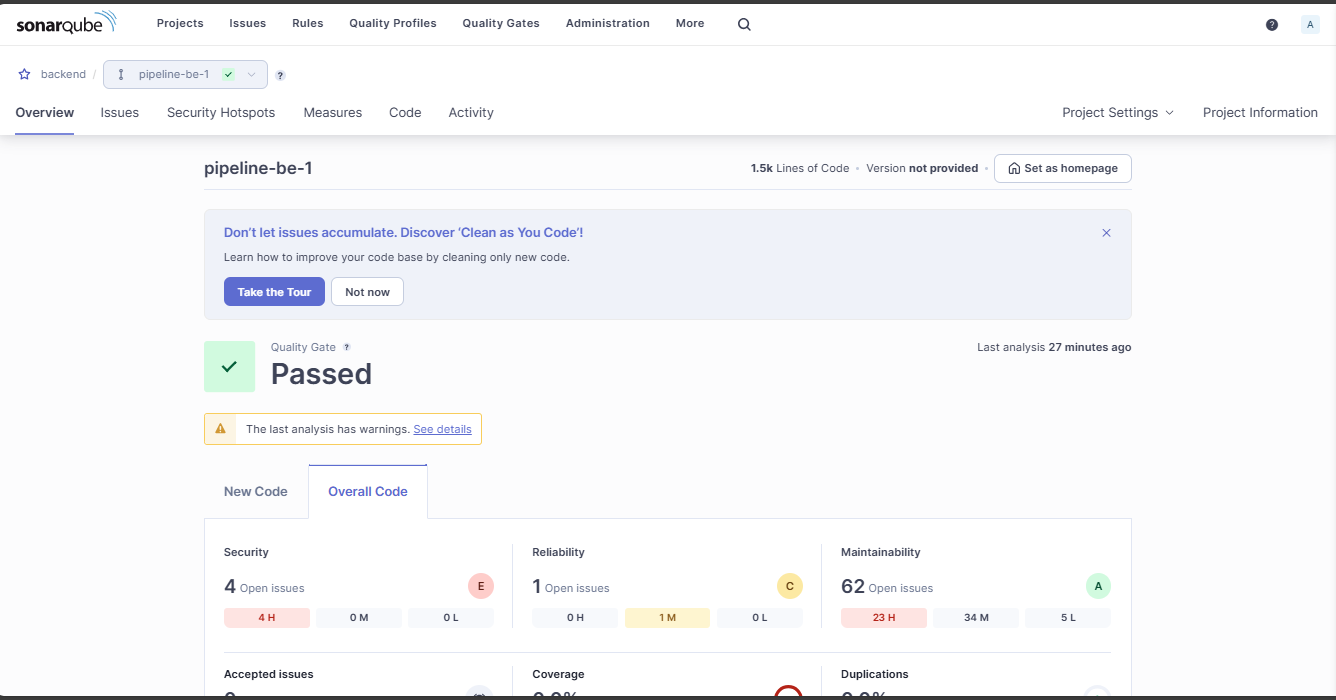
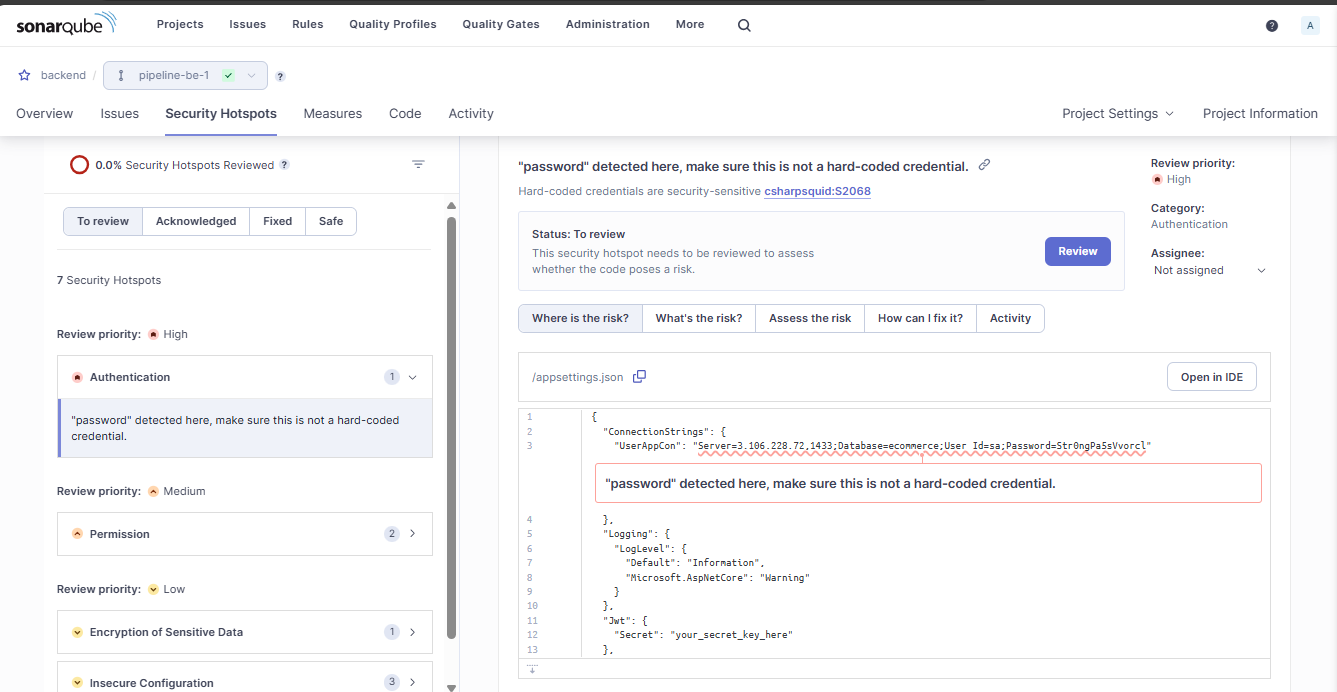
Existing issues
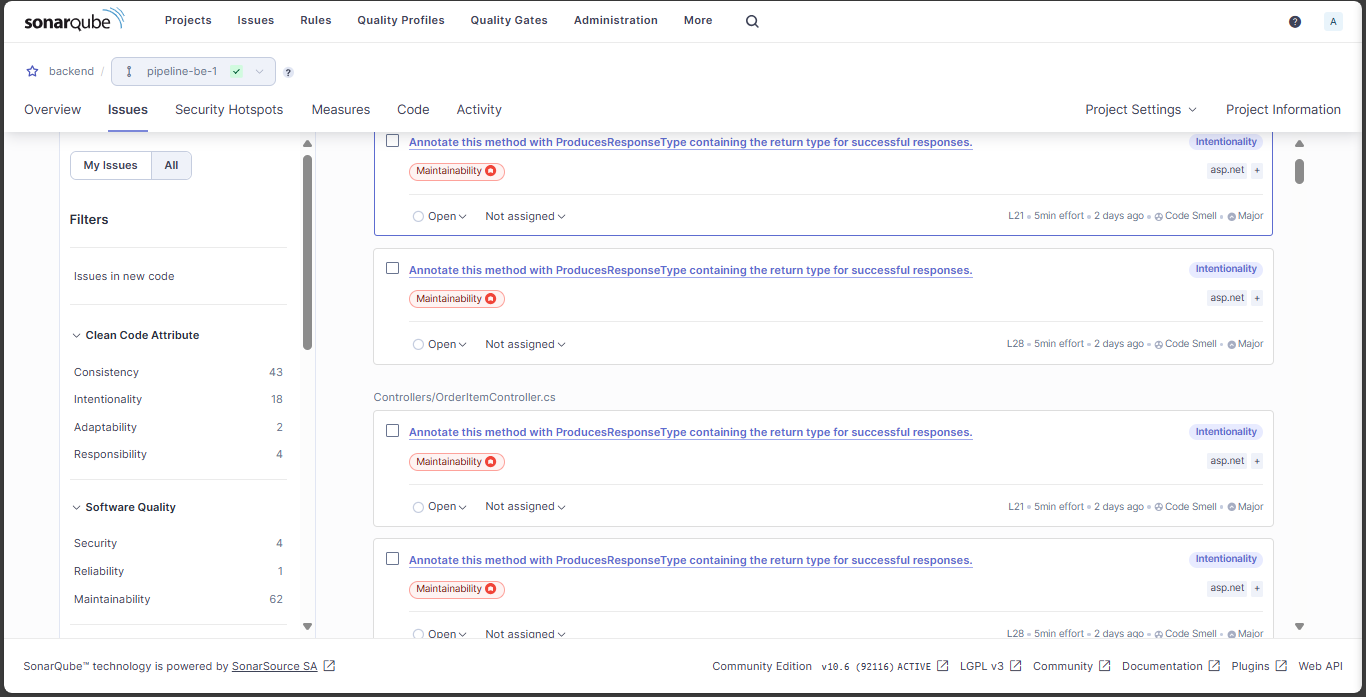
Security issues listed in detail here
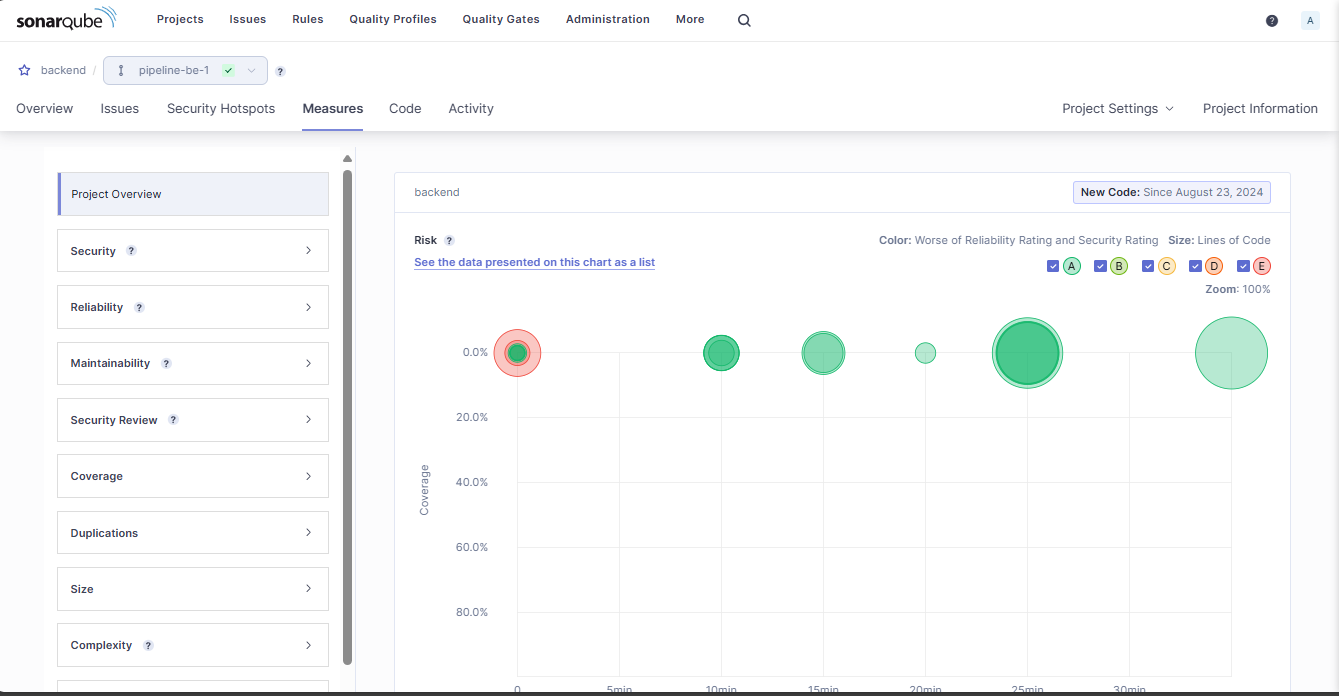
Project metrics
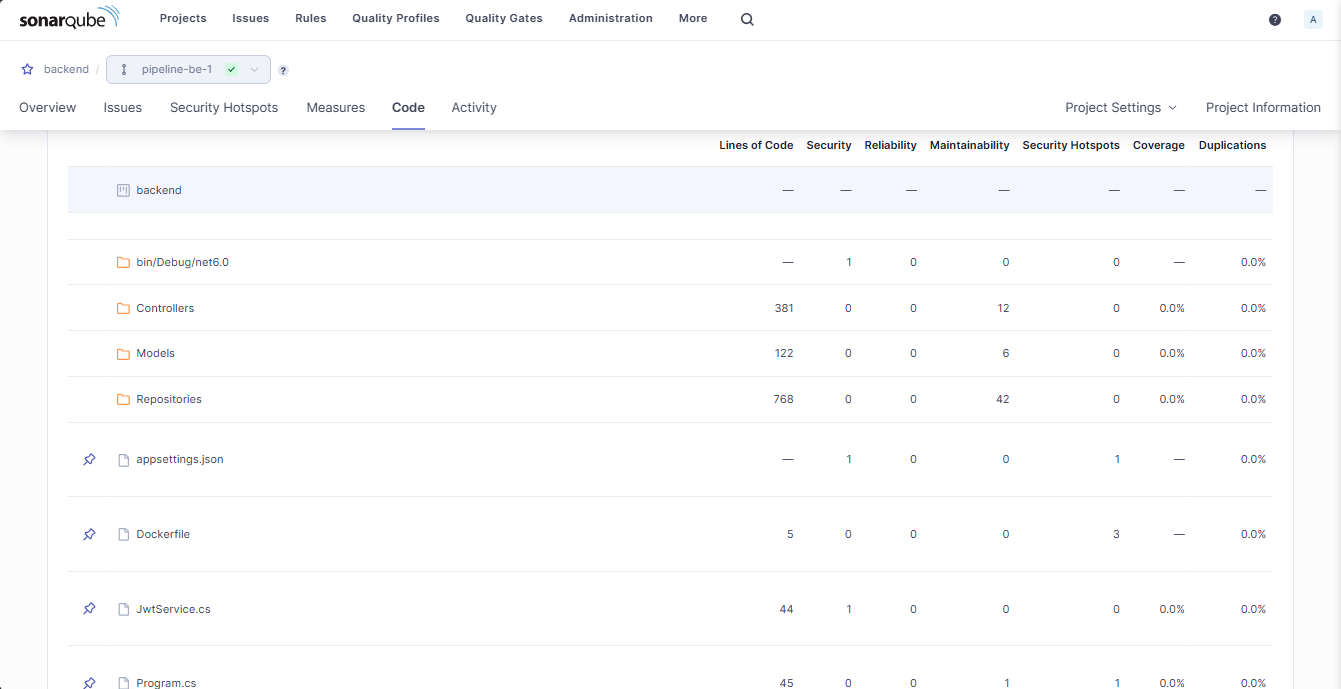
And code errors
We will also deploy similarly for frontend.
First, we need to install sonar-scanner in the build instance with gitlab-runner permissions.
# Download and unzip sonar-scanner
wget https://binaries.sonarsource.com/Distribution/sonar-scanner-cli/sonar-scanner-cli-4.8.0.2856-linux.zip
unzip sonar-scanner-cli-4.8.0.2856-linux.zip
# Move sonar-scanner to /usr/local for easier access
sudo mv sonar-scanner-4.8.0.2856-linux /usr/local/sonar-scanner
export PATH=$PATH:/usr/local/sonar-scanner/bin
# Ensure Java is installed on the system
sudo apt-get update
sudo apt-get install --yes openjdk-17-jre
# Check the version
sonar-scanner -v
Then, in the gitlab-ci.yaml file of the frontend project, enter the following command:
variables:
    USER_PROJECT: "ecommerce"
    PATH_PROJECT: "/home/${USER_PROJECT}/${CI_PROJECT_NAME}"
    IMAGE_VERSION: "${CI_REGISTRY_USER}/${CI_PROJECT_NAME}-${USER_PROJECT}:${CI_COMMIT_REF_NAME}_${CI_COMMIT_SHORT_SHA}"
    CODECLIMATE_FILE: "${CI_PROJECT_NAME}:${CI_COMMIT_REF_NAME}_${CI_COMMIT_SHORT_SHA}.html"

stages:
    - clone
    - SAST
    - build
    - push registry
    - deploy

before_script:
    - sudo mkdir -p $PATH_PROJECT

clone repository:
    stage: clone
    script:
        - echo "Repository cloned."
    tags:
        - group-ecommerce-shell-runner-build

codelimate testing:
    stage: SAST
    variables:
        GIT_STRATEGY: none
    script:
        - sudo docker run --rm --env CODECLIMATE_CODE="$PWD"  --volume "$PWD":/code  --volume /var/run/docker.sock:/var/run/docker.sock  --volume /tmp/cc:/tmp/cc codeclimate/codeclimate analyze -f html > $CODECLIMATE_FILE
    allow_failure: true
    tags:
        - group-ecommerce-shell-runner-build
    only:
        - tags
    artifacts:
        paths:
        - $CODECLIMATE_FILE
        expire_in: 1 week

sonarqube testing:
  stage: SAST
  cache:
    policy: pull
    key: "${CI_COMMIT_SHORT_SHA}"
    paths:
      - sonar-scanner/
  script:
    - "sudo apt-get update"
    - "sudo apt-get install --yes --no-install-recommends openjdk-17-jre"
    - sonar-scanner \
		  -Dsonar.projectKey=ecommerce-fsn_frontend_3cd00dc6-7686-4876-9feb-5526389b35ae \
		  -Dsonar.sources=src \
		  -Dsonar.host.url=$SONAR_HOST_URL \
		  -Dsonar.login=$SONAR_TOKEN
  allow_failure: true
  tags:
    - group-ecommerce-shell-runner-build
  only:
    - tags

build:
    stage: build
    variables:
        GIT_STRATEGY: clone
    before_script:
        - sudo docker login -u $CI_REGISTRY_USER -p $CI_REGISTRY_PWD
    script:
        - sudo docker build -t $IMAGE_VERSION .
    after_script:
        - sudo docker logout
    tags:
        - group-ecommerce-shell-runner-build
    when: manual
    only:
        - tags

dockerhub pushing:
    stage: push registry
    variables:
        GIT_STRATEGY: none
    before_script:
        - sudo docker login -u $CI_REGISTRY_USER -p $CI_REGISTRY_PWD
    script:
        - sudo docker push $IMAGE_VERSION
    after_script:
        - sudo docker logout
    tags:
        - group-ecommerce-shell-runner-build
    needs:
        - job: build
    only:
        - tags

deploy:
    stage: deploy
    variables:
        GIT_STRATEGY: none
    before_script:
        - sudo docker login -u $CI_REGISTRY_USER -p $CI_REGISTRY_PWD
    script:
        - sudo docker pull $IMAGE_VERSION
        - sudo su ${USER_PROJECT} -c "
            container_exists=\$(sudo docker ps -a -q -f name=${CI_PROJECT_NAME});
            if [ ! -z \"\$container_exists\" ]; then
                sudo docker rm -f ${CI_PROJECT_NAME};
            fi;
            sudo docker run --name ${CI_PROJECT_NAME} -dp ${FRONTEND_PORT}:80 ${IMAGE_VERSION}"
    after_script:
        - sudo docker logout
    tags:
        - group-ecommerce-shell-runner
    needs:
        - job: dockerhub pushing
    only:
        - tags
I have gone through the SAST implementation with 3 different approaches (CLI, Cloud and Self-Host) with 3 different tools. With each tool, you will find and read the documentation that the tool provides and see if that tool has any approaches and then deploy them into the CI/CD pipeline. With this mindset, you will choose the appropriate approach for your business in each specific case to improve work efficiency and minimize errors in the coding process.