Install Tools
1. Update and Upgrade Libraries
Switch to root, update and upgrade libraries.
sudo -i
apt update
apt upgrade -y
2. Create Working Directory
mkdir tools
cd tools && mkdir docker gitlab
3. Install Tools
3.1 Install .NET 6
Refer to the installation link: Install .NET on Ubuntu - .NET | Microsoft Learn
Create setup.sh file.
vi dotnet/setup.sh
Enter the following content:
#!/bin/bash
sudo apt-get update
sudo apt-get install -y dotnet-sdk-6.0
sudo apt-get update
sudo apt-get install -y aspnetcore-runtime-6.0
# Version sdks
dotnet --list-sdks
# Version runtimes
dotnet --list-runtimes
# Version dotnet
dotnet --version
Run the command:
sh dotnet/setup.sh
3.2 Install Node 18
Refer to the installation link: How To Install Node.js on Ubuntu 22.04 | DigitalOcean
Create setup.sh file.
vi node/setup.sh
Enter the content:
#!/bin/bash

# Download and install NVM
echo "### Downloading nvm..."
curl -o- https://raw.githubusercontent.com/nvm-sh/nvm/v0.39.1/install.sh | bash

# Set up environment variables for NVM
export NVM_DIR="$([ -z "${XDG_CONFIG_HOME-}" ] && printf %s "${HOME}/.nvm" || printf %s "${XDG_CONFIG_HOME}/nvm")"
[ -s "$NVM_DIR/nvm.sh" ] && \. "$NVM_DIR/nvm.sh" # This loads NVM into the current shell

# Reload shell configuration
source ~/.bashrc

# Check if NVM is installed
nvm -v

# Download and use Node.js version 18
echo "### Downloading Node.js v18..."
nvm install 18
nvm use 18

# Check Node.js and NPM versions
echo "### Checking Node.js and NPM versions..."
node -v
npm -v

# Copy Node.js and NPM to /usr/local for system-wide use
n=$(which node)
n=${n%/bin/node}
sudo cp -r $n/bin/* /usr/local/bin/
sudo cp -r $n/lib/* /usr/local/lib/
if [ -d "$n/share" ]; then sudo cp -r $n/share/* /usr/local/share/; fi

# Verify Node.js after copying
echo "### Checking Node.js after copying..."
node -v
npm -v
Run the command:
bash node/setup.sh
Use bash here because source ~/.bashrc is only compatible with bash.
3.3 Install Docker
Refer to the installation link: How To Install and Use Docker on Ubuntu 22.04 | DigitalOcean
Create setup.sh file.
vi docker/setup.sh
Enter the content:
#!/bin/bash
sudo apt install -y apt-transport-https ca-certificates curl software-properties-common
curl -fsSL https://download.docker.com/linux/ubuntu/gpg | sudo gpg --dearmor -o /usr/share/keyrings/docker-archive-keyring.gpg
echo "deb [signed-by=/usr/share/keyrings/docker-archive-keyring.gpg] https://download.docker.com/linux/ubuntu $(lsb_release -cs) stable" | sudo tee /etc/apt/sources.list.d/docker.list > /dev/null
sudo apt update -y
sudo apt install docker-ce -y
sudo systemctl start docker
sudo systemctl enable docker
sudo curl -L "https://github.com/docker/compose/releases/latest/download/docker-compose-$(uname -s)-$(uname -m)" -o /usr/local/bin/docker-compose
sudo chmod +x /usr/local/bin/docker-compose
docker -v
docker-compose -v
Run the command:
sh docker/setup.sh
3.4 Install GitLab Runner
Refer to the installation link: Install GitLab Runner | GitLab
Create setup.sh file.
vi gitlab/setup.sh
Enter the installation commands:
#!/bin/bash
apt update -y
curl -L "https://packages.gitlab.com/install/repositories/runner/gitlab-runner/script.deb.sh" | sudo bash
apt install gitlab-runner
gitlab-runner --version
Run the command:
sh gitlab/setup.sh
4. Register GitLab Runner
We will create a GitLab Runner at the Build Instance.
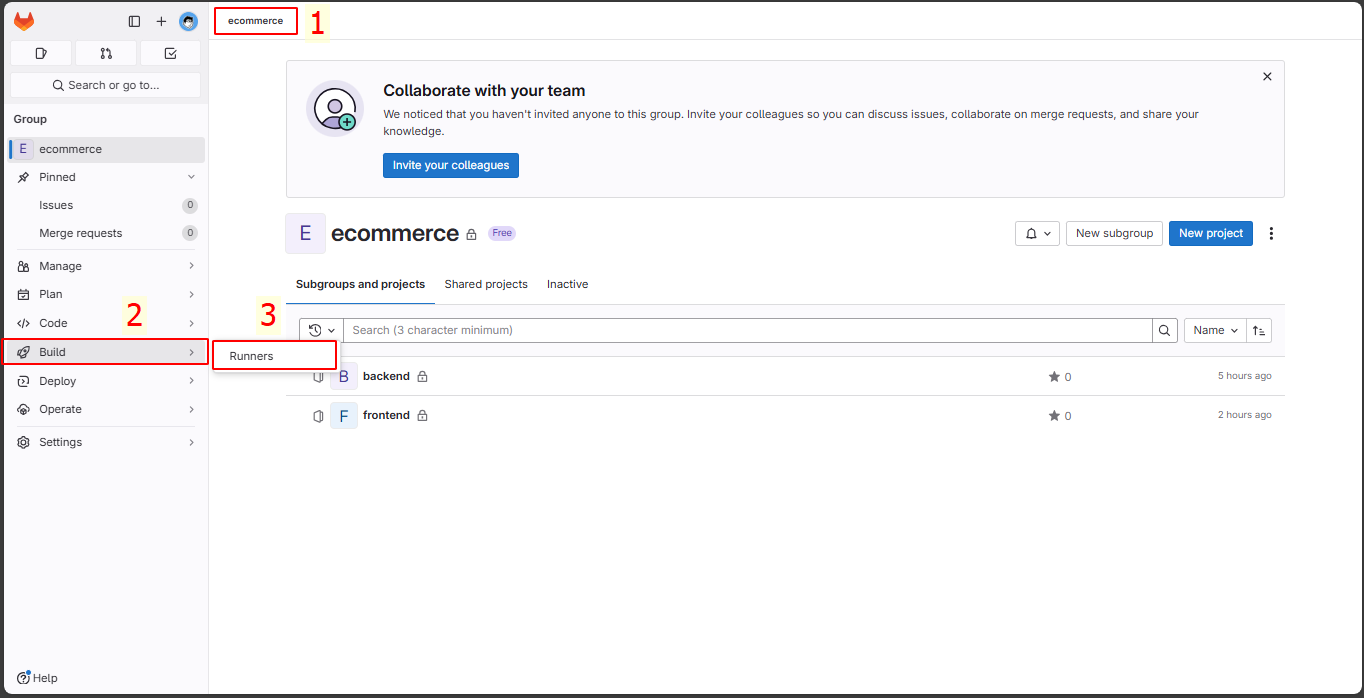
First, go to the group ecommerce → Build → Runners.
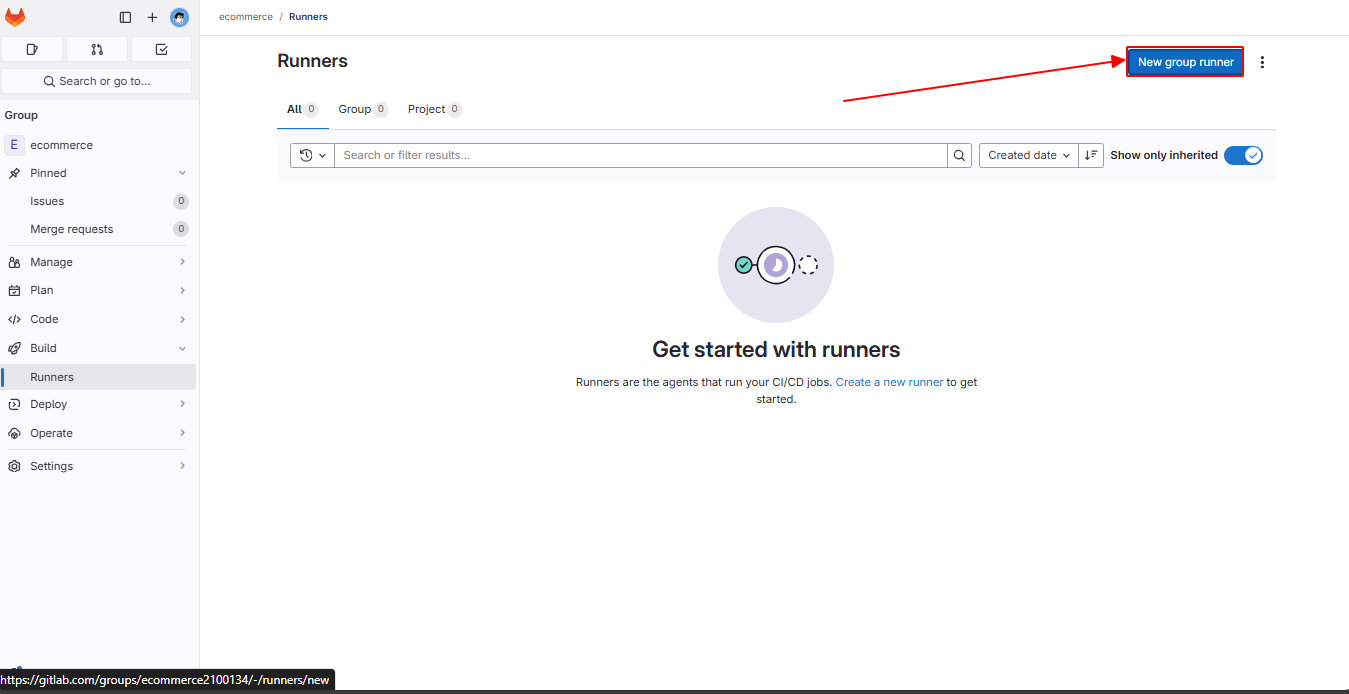
Click on “New group runner” to create one.
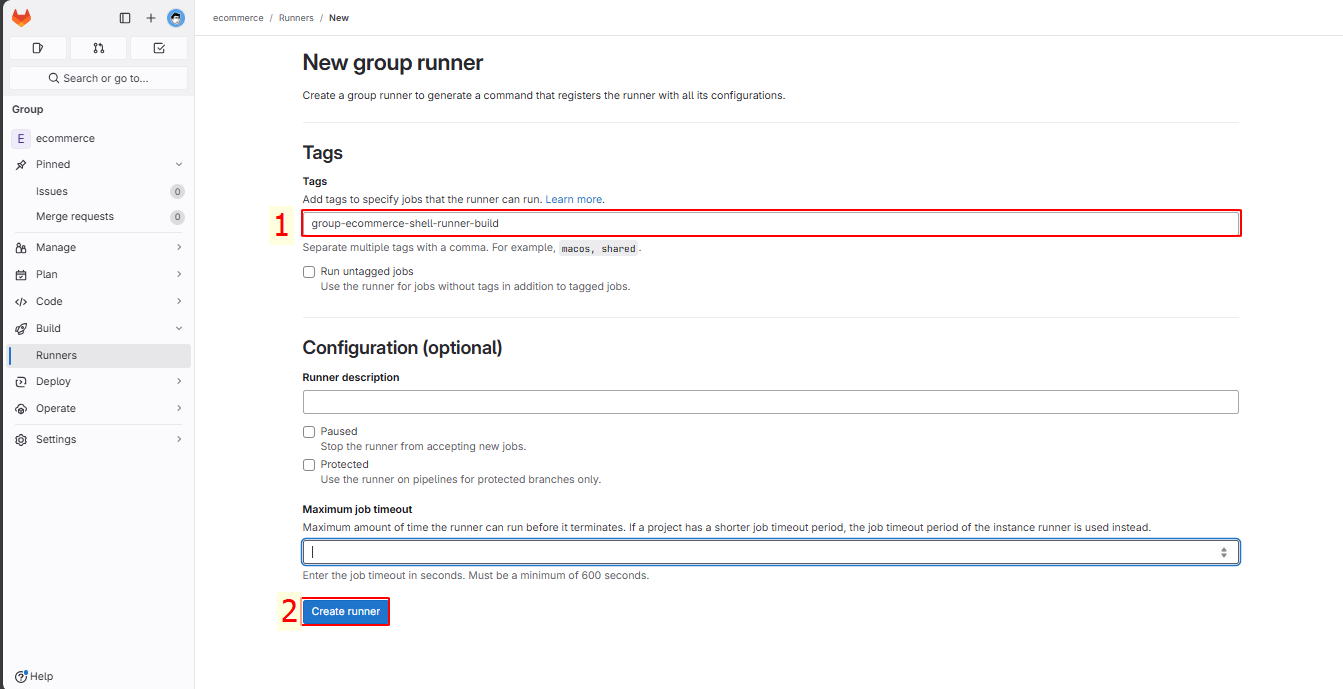
Create a new runner with the following details:
- Tags: group-ecommerce-shell-runner-build
- Click “Create Runner” to create it.
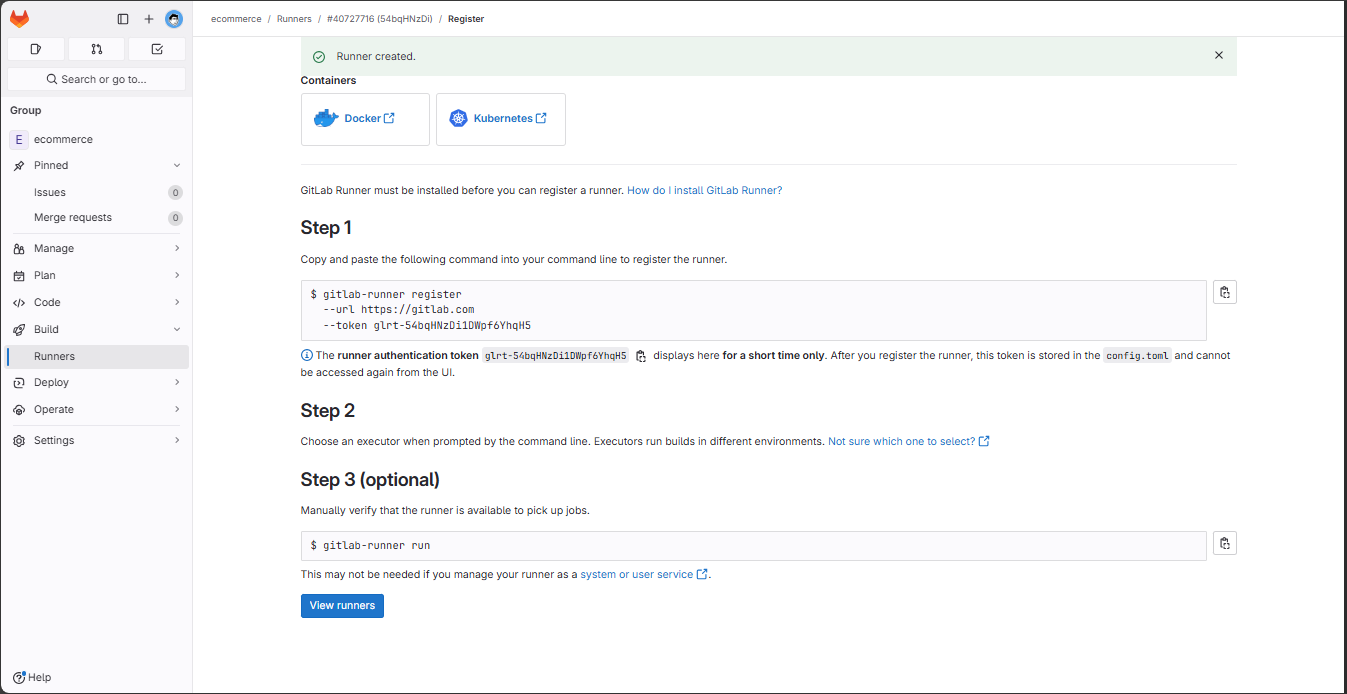
After creating it, you will get steps to register the runner.
First, switch to the gitlab-runner user so the runner can operate correctly.
su gitlab-runner
cd

In step 1 and 2, run the commands and fill in the information as shown:
- URL: https://gitlab.com
- Name runner: group-ecommerce-shell-runner-build
- Executor: shell
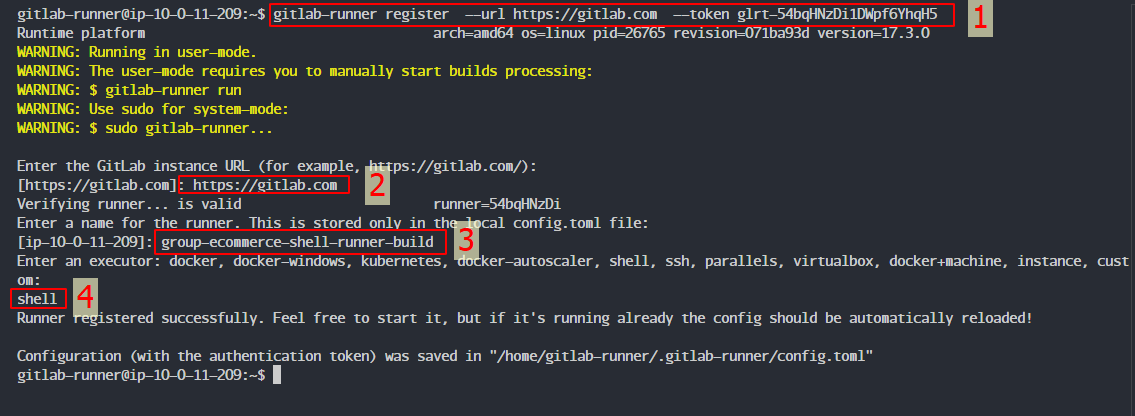
The configuration file will be saved at /home/gitlab-runner/.gitlab-runner/config.toml.
vi /home/gitlab-runner/.gitlab-runner/config.toml
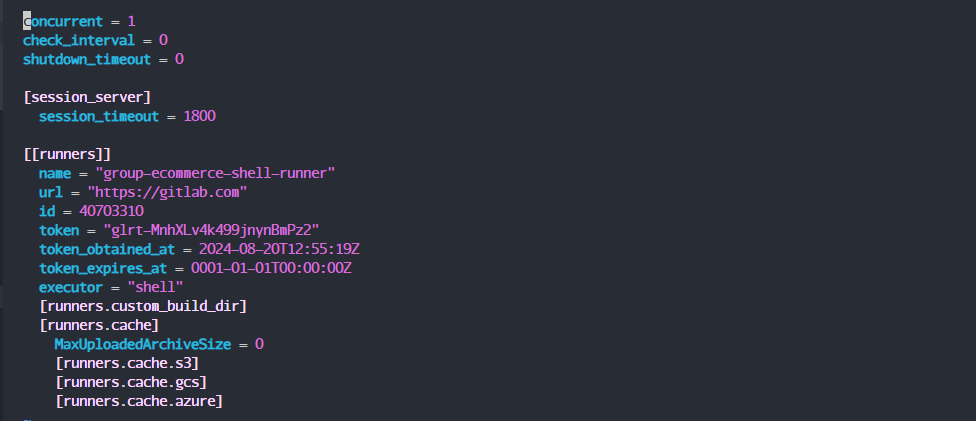
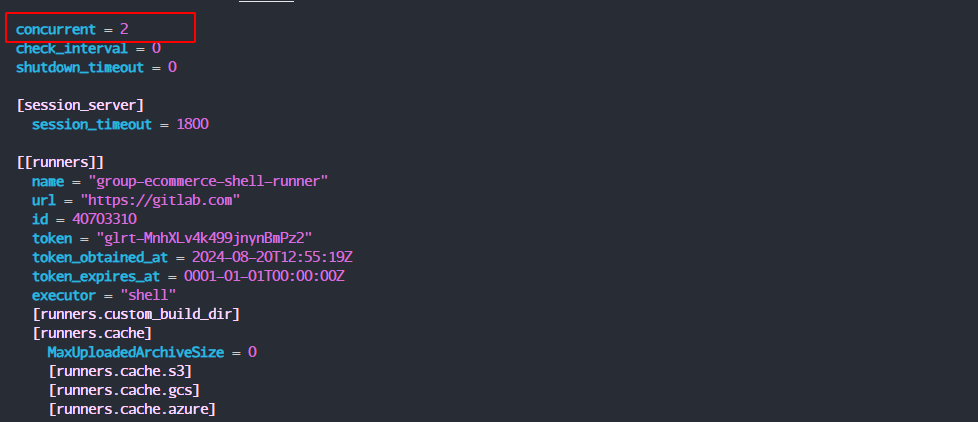
Update concurrent = 2 so the group runner can handle both backend and frontend simultaneously, then save with Esc+ :x.
In step 3, run:
nohup gitlab-runner run > start-gitlab-runner.txt 2>&1 &

You will see the GitLab interface showing the runner is connected.

Thus, the registration is complete!