Introduction to DevSecOps
1. Current Environments
Businesses and companies today have three main environments:
- Development
- Pre-production
- Production
1.1 Development Environment
Purpose: This is the environment where developers work directly to write code, develop new features, fix bugs, and make necessary changes to the software.
Characteristics:
- Usually contains incomplete or in-development code.
- Development tools, debuggers, and simulators are often used here.
- This environment can be unstable and does not need to adhere to the high-quality standards of the production environment.
- Often uses simulated databases or services with dummy data.
Example: When a developer is adding a new feature or fixing a bug, they will work in the development environment to check if their code works as expected.
1.2 Pre-production Environment
Purpose: This environment is for comprehensive testing before the code is deployed into production. It often closely mimics the production environment.
Characteristics:
- Used for comprehensive testing, including integration testing, system testing, and acceptance testing.
- Data and configuration in this environment are often similar to or identical to the production environment, but not real data.
- This environment is used to detect bugs or issues that may not appear in the development environment.
- Builds here have usually passed tests in the development environment and are ready for final checks before production deployment.
Example: Before deploying a new software version, the development team will deploy the code to the pre-production environment to check for compatibility, performance, and system responsiveness under production-like loads.
1.3 Production Environment
Purpose: This is the environment where the software runs in reality and serves end users. It is the most critical environment, requiring high stability, security, and performance.
Characteristics:
- The code here has been thoroughly tested and is ready to be used by customers or end users.
- This environment contains real data, transactions, and sensitive information, thus requiring high security.
- Availability and performance are top priorities, as any issues can directly impact users and the business’s revenue.
- Changes in the production environment are often tightly controlled and deployed through strict processes to minimize risk.
Example: When a new software version has passed all tests in the pre-production environment, it is deployed to the production environment for end users to access and use.
2. Project Deployment Methods
Three popular project deployment methods today include:
- Service
- Container Standalone
- Container Orchestration
2.1 Service (Traditional Service)
This is the traditional software deployment method, where applications are installed directly on physical or virtual servers (VMs).
Services like web servers (Apache, Nginx), databases (MySQL, PostgreSQL), and other applications are installed, configured, and managed directly on the server’s operating system.
Example: A web application is deployed on a server running Nginx, with a MySQL database installed on the same or a different server.
2.2 Container Standalone
Containers are a method of packaging applications along with their dependencies into a lightweight, portable environment that can run consistently on any operating system that supports containers.
When deploying as a standalone container, the application is packaged into a container (e.g., Docker) and run on a server or group of servers, but without orchestration tools to manage these containers.
Example: A web application is packaged in a Docker container and deployed on a single server, with the containers managed manually.
2.3 Container Orchestration
Container orchestration is the method of managing and orchestrating containers across one or more servers, typically using tools like Kubernetes, Docker Swarm, or Apache Mesos.
The orchestration system handles tasks such as deployment, scaling, load balancing, and container recovery in case of failure.
Example: A microservices application consisting of multiple containers (database, API, frontend) is deployed on Kubernetes. Kubernetes manages the deployment, scaling, and recovery of these containers across a cluster of servers.
3. Deployment Methods
There are two deployment methods:
- Build and Deploy on the same server
- Build and Deploy on different servers
3.1 Build and Deploy on the Same Server
In this method, the process of building (compiling source code into a deployable application) and deploying (deploying the application to the production environment) is performed on the same server.
The source code is checked out directly on this server, then the build process is executed locally, and the application is immediately deployed on that server.
Example: A simple website is deployed on a single server, where developers push source code, build, and deploy directly on this server.
3.2 Build and Deploy on Different Servers
In this method, the build process is performed on a separate server, and after the build process is completed, the application is transferred for deployment on another (or multiple) servers.
The build server is often a dedicated system with the necessary tools to build the source code, while the deployment server is where the application runs in the production environment.
Example: A large enterprise application with multiple microservices, where the build process takes place on dedicated CI/CD servers like Jenkins, and then the application is deployed on various servers (e.g., staging or production environment).
3.3 Basic Components of a DevSecOps Pipeline
- Build: Building and compiling the source code into deployable Artifacts or Registries.
- Test: Ensuring the source code functions as expected and does not cause errors.
- Deploy: Deploying the built Artifacts or Registries to the production environment.
4. General DevSecOps Process
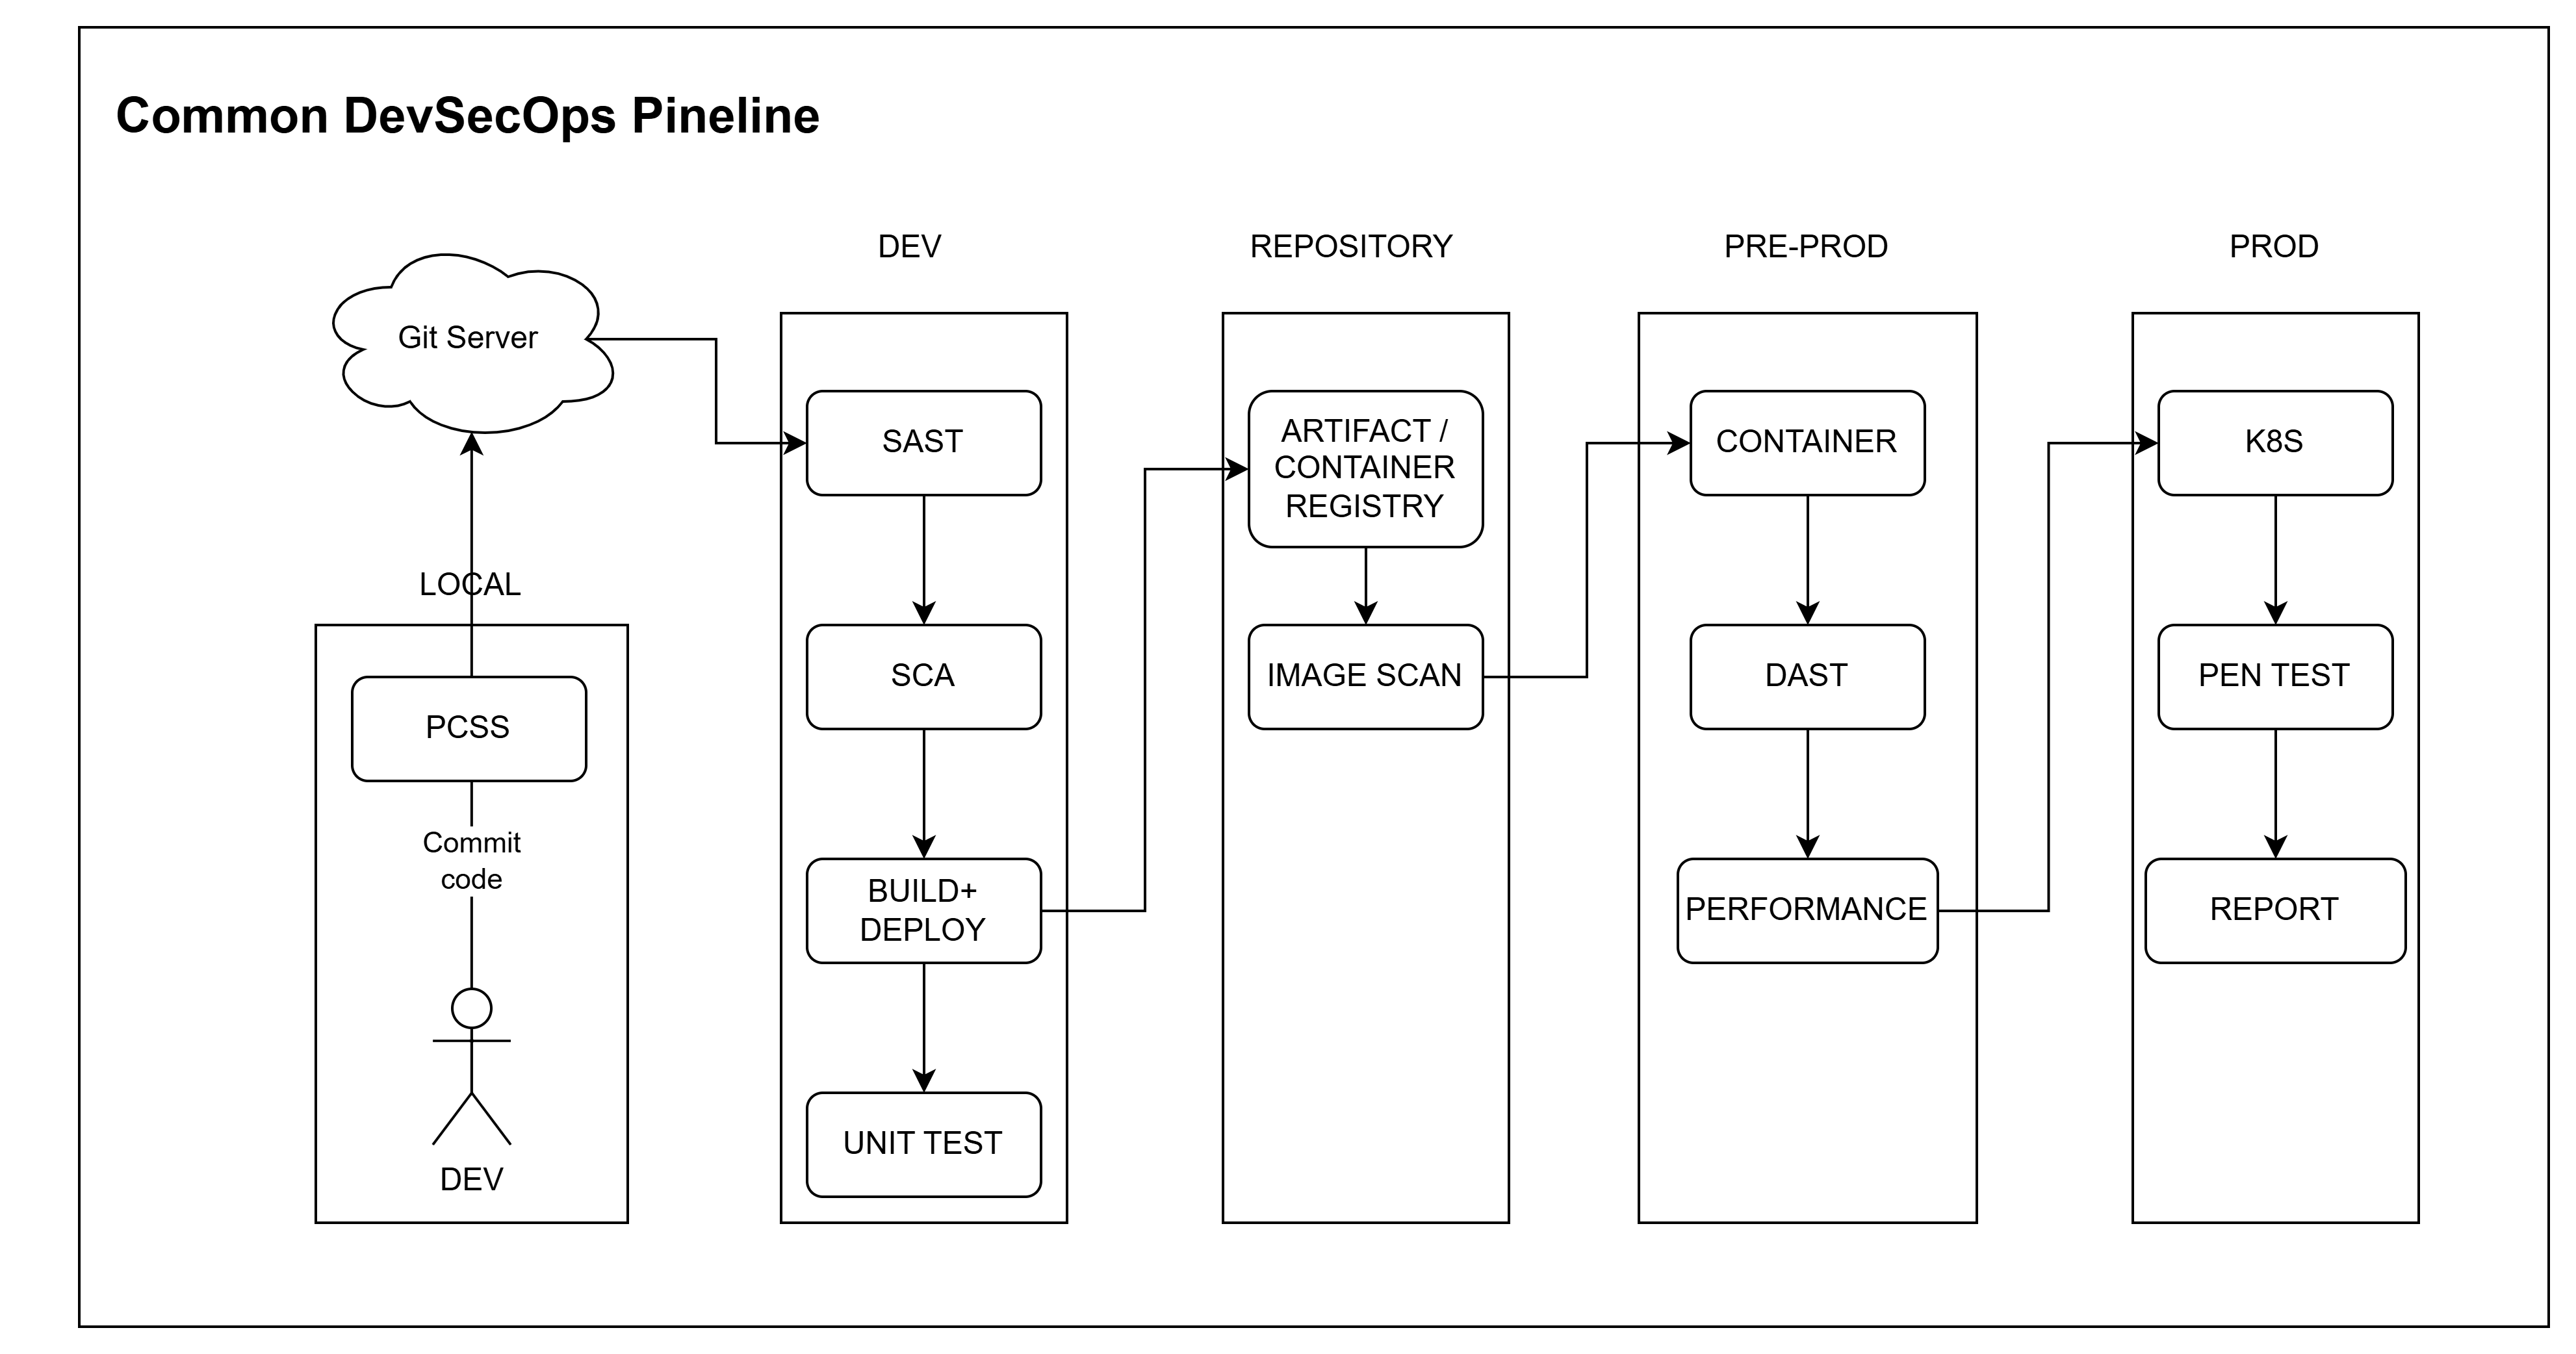
There are 5 main stages:
- LOCAL: This is the stage in the local environment on your computer.
- DEV: This is the application development stage.
- REPOSITORY: This is the stage that stores the project’s builds.
- PRE-PROD: This is the stage before the product is released into reality.
- PROD: This is the stage closest to the end user, producing the actual products that users can use.
4.1 Local Stage
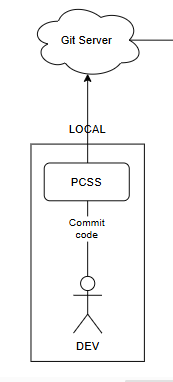
First, after a developer finishes coding features, they will commit their code to the Git Server.
At this point, PCSS (Pre-Commit Configuration for Secret Scanning) will scan secrets before committing. It acts as an intermediary to configure the source code scan for sensitive information before committing it to the repository.
For example: Install tools like Git-secrets, TruffleHog, Talisman to scan the source code before committing to the repo to detect sensitive information such as passwords, API keys.
After passing the check, the source code is committed to the repository on the Git Server.
4.2 Dev Stage
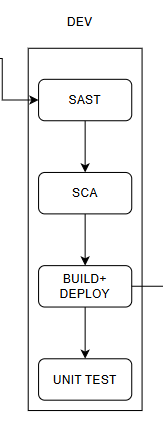
When the dev branch receives the source code from feature branches like the GitFlow model, we will perform SAST (Static Application Security Testing).
SAST is a step for checking static code security to detect security vulnerabilities before building and deploying. SAST analyzes the source code without executing it.
Popular tools:
- SonarQube
- Fortify
- Checkmarx
- Veracode
After completing SAST, the next step is SCA (Software Composition Analysis).
SCA checks third-party components in the source code for security vulnerabilities and ensures compliance with policies.
For example: Use tools like Snyk or OWASP Dependency-Check to check libraries and third-party components for security vulnerabilities.
Then, proceed to the Build step (deployment can also be done at this step, and unit testing can be performed for the application).
4.3 Repository Stage
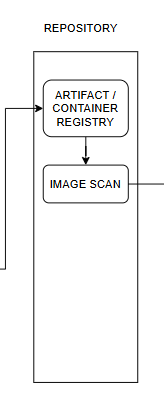
After the builds are completed, they will be stored in an Artifact (e.g., Azure Artifacts, JFrog Artifactory, Nexus Repository) if deployed as a service. If deployed via Kubernetes or standalone containers, the builds will be stored in a Container Registry (e.g., ECR, Docker Hub, GCR).
When stored, an Image Scan must be performed to ensure that container images and other components do not contain security vulnerabilities.
For example: Use tools like Docker Bench for Security to scan Docker images before deployment.
4.4 Pre-Prod Stage
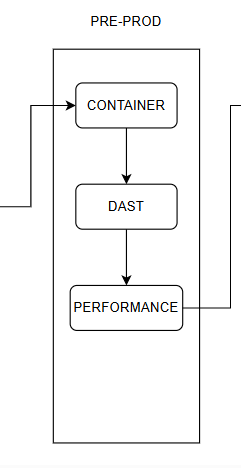
Here, after scanning the images from the previous stage, the application will be deployed on containers. After deployment, the DAST (Dynamic Application Security Testing) step is performed.
DAST tests security by interacting with the application in its operational environment, typically through a web browser or user interface.
DAST simulates attacks on the application from the outside, just like a hacker would, and analyzes the application’s responses to detect security vulnerabilities.
Popular DAST tools: OWASP ZAP (Zed Attack Proxy), Burp Suite, Acunetix.
After completing the DAST step, proceed to Test Performance. This step checks if resources are too large and optimizes resources from the images to increase deployment and operational performance.
4.5 Production Phase
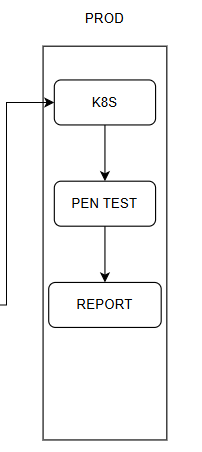
Deploy the actual application on Kubernetes (k8s). Kubernetes helps to connect the containers and manage them more easily.
After deployment, perform the Pen Test (Penetration Testing). Pen Test is a comprehensive security check by simulating real attacks from the outside to find and exploit security vulnerabilities. This includes web applications, network systems, infrastructure, and other devices.
Finally, monitor the application and send reports to track the application’s status.
5. Conclusion
This is not an exhaustive process that can be combined in all situations, as each company will have different deployment methods and may omit a few steps in the process.
Complete process: Commit → PCSS → SAST → SCA → Build → Deploy for Unit Testing → Artifact → Image Scan → Deploy Pre-Prod → DAST → Performance → Deploy Prod → Pen Test → Report
Company A: Commit → PCSS → SAST → Build → Deploy Prod
Company B: Commit → Build → Artifact → Image Scan → Deploy Prod → Report
In general, you need to carefully review the documentation and the applicability of the steps in your organization’s and team’s process to ensure it fits the current situation. For example, if your application is small and has few users, and is only deployed on a simple network infrastructure, you can omit some steps like Performance, Pen Test, DAST, Deploy for Unit Testing, to make it easier to apply.