Create EC2 Instance
Amazon EC2
Amazon Elastic Compute Cloud (Amazon EC2) provides on-demand, scalable computing capacity in the Amazon Web Services (AWS) Cloud.

Main Use Case of EC2 in the Workshop
In this workshop, Amazon EC2 is used to deploy a simple Golang application. To optimize costs and resources, we are using the t2.micro instance type. This instance type is ideal for small-scale applications or development environments, providing basic resources at a low cost.
Why choose t2.micro:
- Low Cost: This instance type falls under the Free Tier (free within AWS Free Tier limits), making it suitable for learning or experimentation.
- Basic Resources: Offers 1 vCPU and 1GB of RAM, sufficient to run a simple Golang application or test basic AWS services.
- Burstable Performance: Provides the ability to boost performance when needed, useful for applications with variable workloads.
Create an EC2 Instance on AWS
You can create a Linux instance using the AWS Management Console by following the instructions below. This guide is designed to help you quickly create your first instance, so it doesn’t cover all possible options.
For detailed information on advanced options, check the guide on creating an instance using the Launch Instance wizard. For other ways to create your instance, refer to the guide on creating an instance.
1. Access AWS Console
- Open your browser and go to the Amazon EC2 console at EC2 Console.
2. Select Launch Instance
- In the EC2 dashboard, click Launch Instance in the Launch instance box.
3. Name Your Instance
- Under Name and tags, enter a descriptive name for your instance.
4. Choose an Image (Amazon Machine Image - AMI)
- Under Application and OS Images (Amazon Machine Image), follow these steps:
- Select Quick Start, then choose Amazon Linux. This will be the operating system (OS) for your instance.
- From the Amazon Machine Image (AMI), select a HVM version of Amazon Linux 2023. These AMIs are labeled Free tier eligible. An AMI is a basic configuration used as a template for your instance.
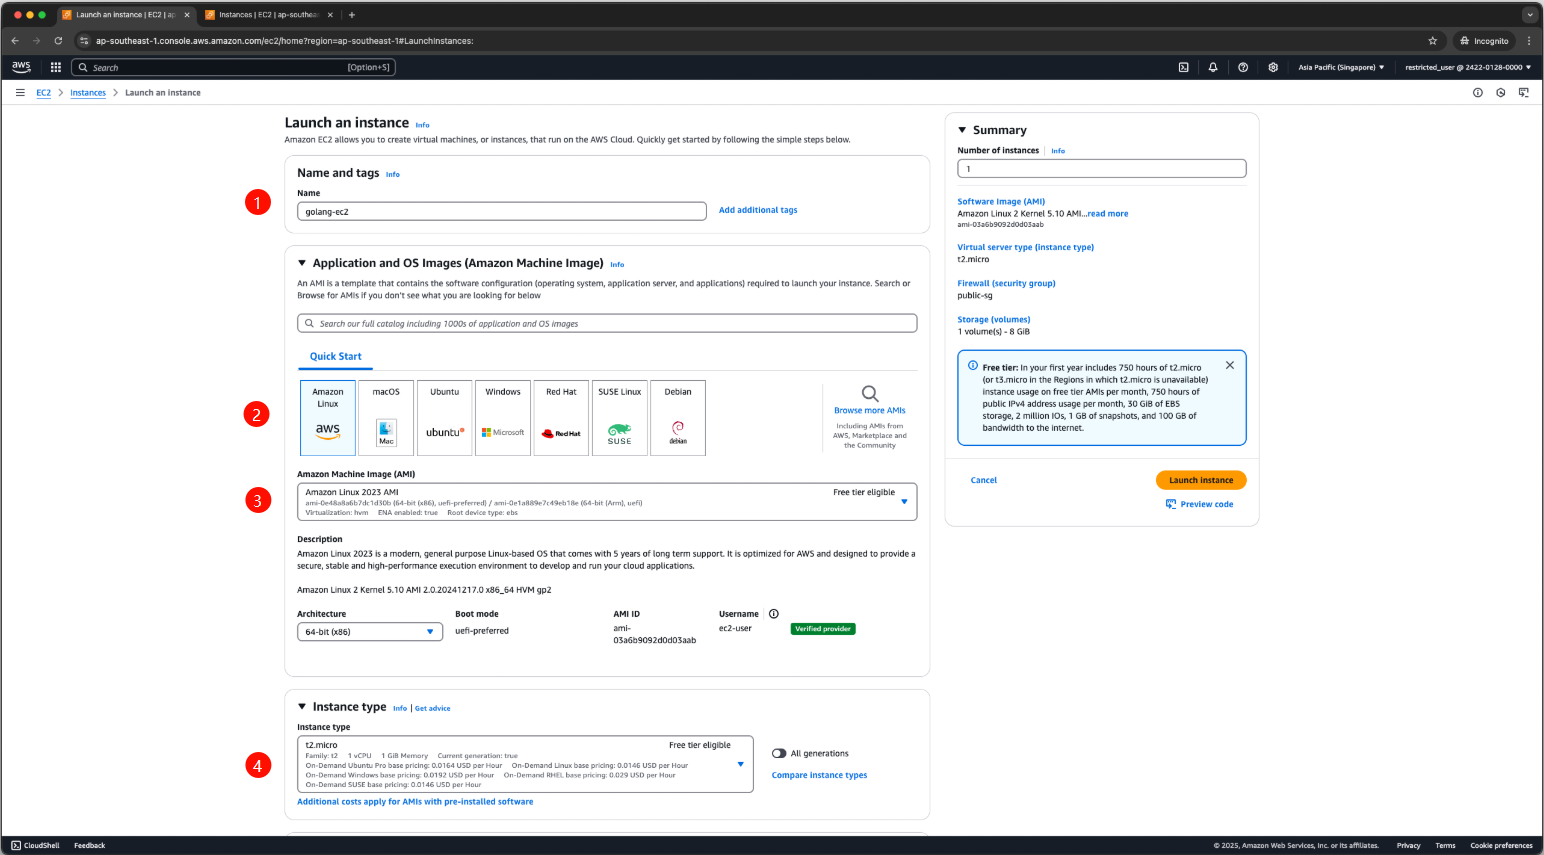
5. Choose Instance Type
- Under Instance type, from the list, select the hardware configuration for your instance. Choose t2.micro, which is selected by default. The t2.micro instance type is eligible for AWS Free Tier. If t2.micro is unavailable in your region, you can use t3.micro, which is also eligible for AWS Free Tier. For more information, see AWS Free Tier.
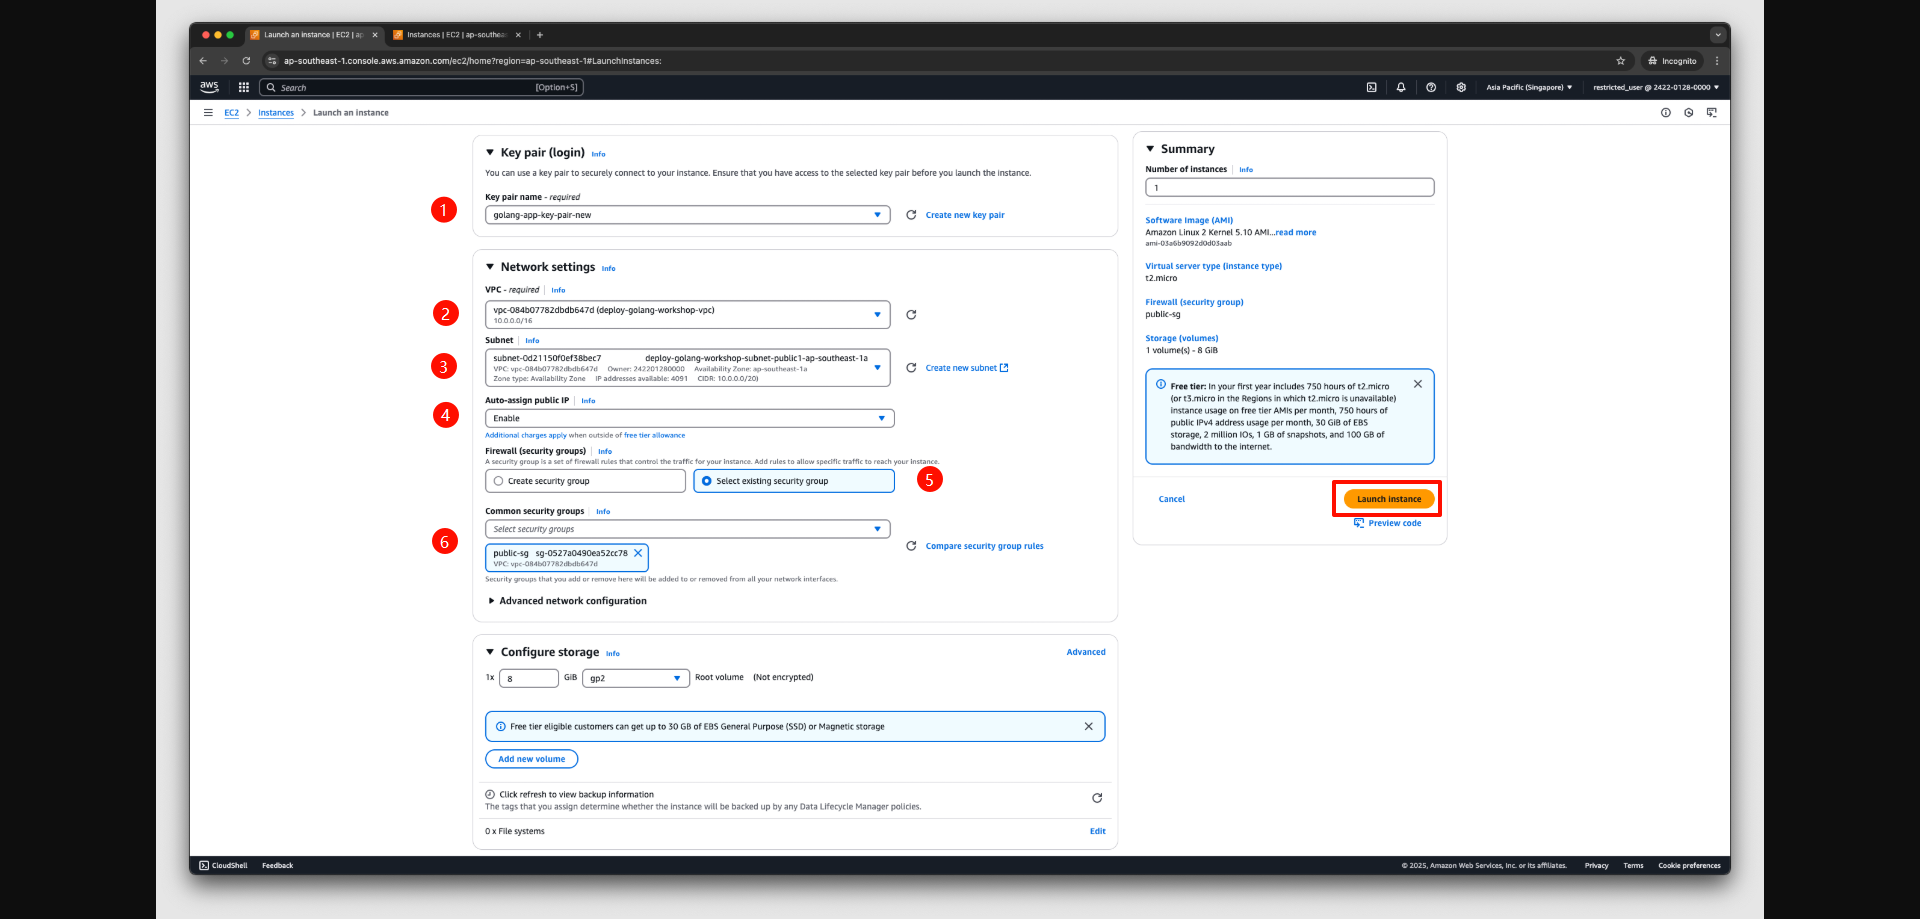
6. Select Key Pair
- Under Key pair (login), choose a key pair name. Select the key pair you created during setup.
Warning: Do not select Proceed without a key pair (not recommended). If you create an instance without a key pair, you will not be able to connect to it.
7. Configure Security Group
- Next to Network settings, click Edit. For the Security group name, you’ll see that a security group has already been created and selected for you. Select the security group you created during setup by following these steps:
- Choose Select existing security group.
- From Common security groups, select your security group from the list of available security groups.
- Review and launch the instance.
- Leave the default settings for other instance options.
- Review your instance configuration summary in the Summary panel, and when you’re ready, click Launch instance.
8. Confirm and Monitor
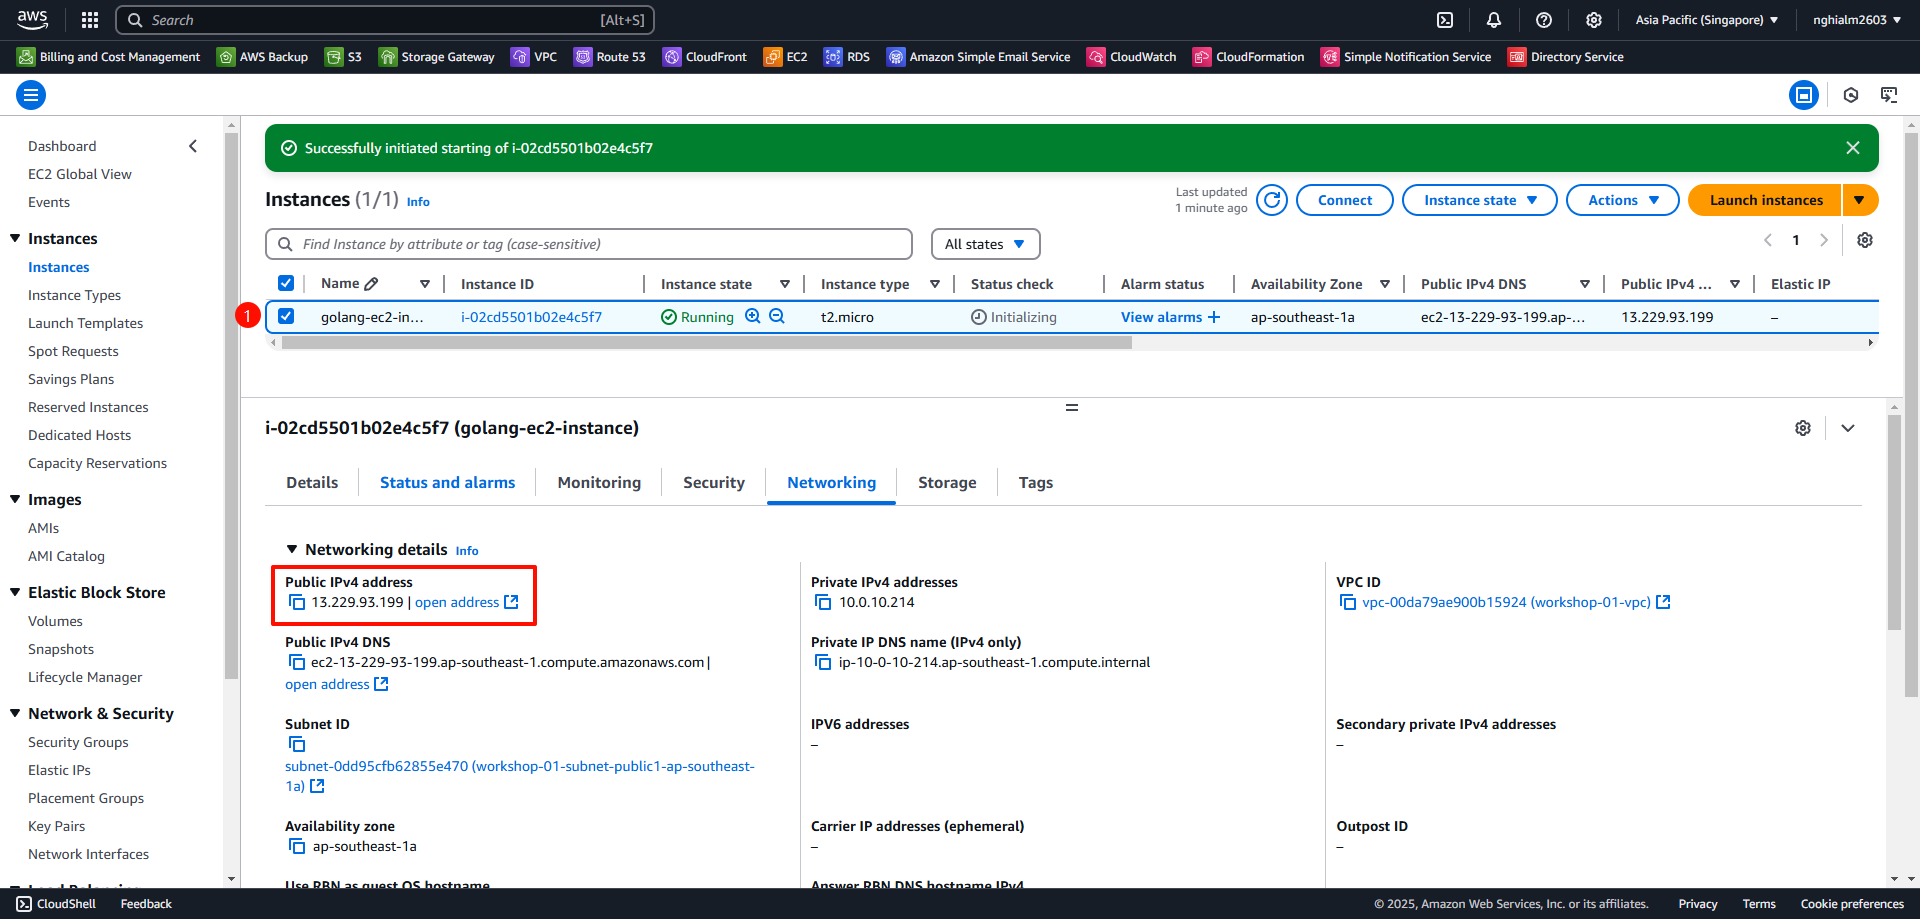
- A confirmation page will appear indicating that your instance is being launched. Click View all instances to close the confirmation page and return to the console interface.
- On the Instances screen, you can see the status of your launch process. It takes a short time for the instance to start. When it is launched, its status will change from pending to running, and it will receive a public DNS name. If the Public IPv4 DNS column is hidden, click the settings icon in the upper-right corner, enable Public IPv4 DNS, and click Confirm.
- It may take a few minutes for the instance to be ready for connection. Check if the instance passes the status check; you can see this information in the Status check column.

Review your Public IPv4, Please choose EC2 Instance > Networking tab > Public IPv4 Address
Test Connection to EC2 Instance
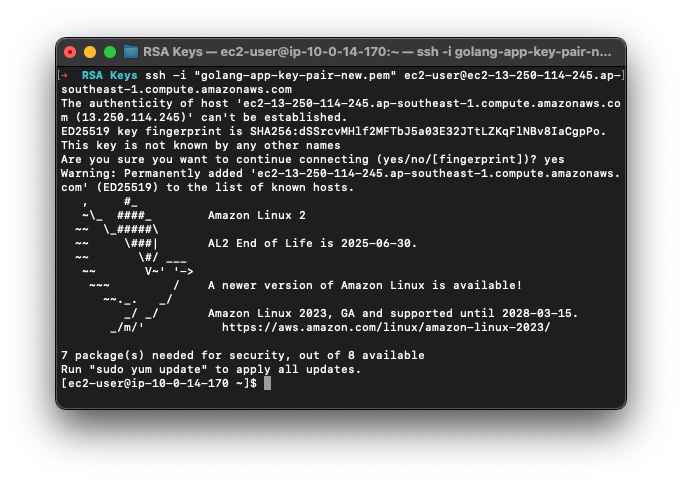
1. Connect to EC2 Instance via SSH
- Select the EC2 instance you just created, and click Connect.
- In the Connect to instance interface, select the SSH Client tab.
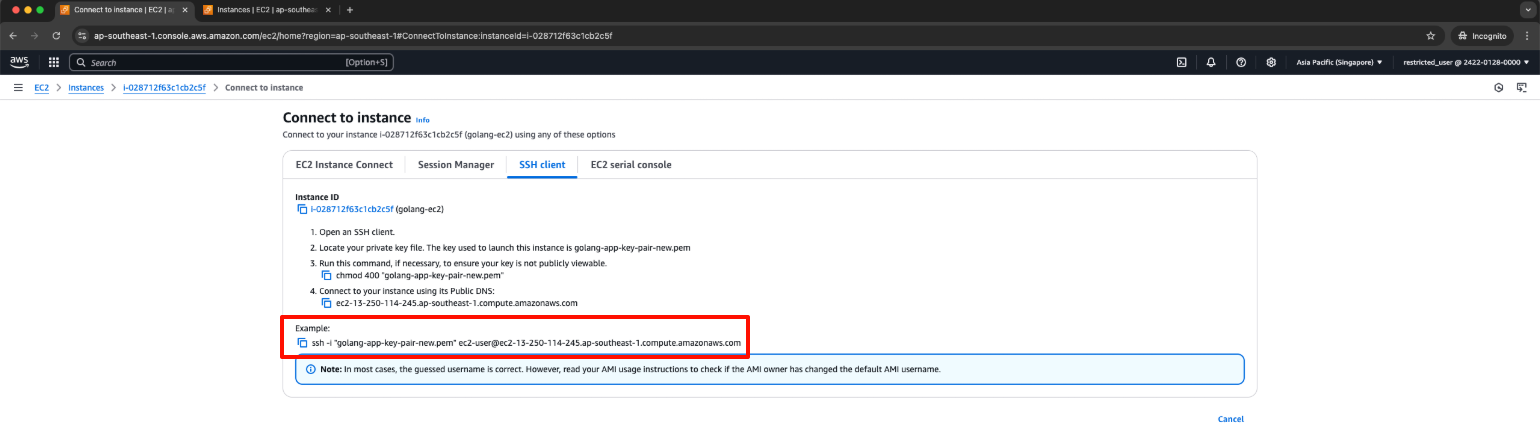
- If you’re using Windows, install WSL2 to run Linux commands (alternatively, you can use the Putty application).
- If you’re using macOS, copy the example SSH command and paste it into the Terminal. The command will have the following syntax:
$ chmod 400 "key-pair.pem"
$ ssh -i path/to/key-pair.pem ec2-user@domain
2. Successful Connection